
ProjectPlace for Product Delivery
Software product delivery is a complex and challenging process. Teams must contend with a backlog of work that needs to be sized and prioritized, often without clear visibility into the product roadmap. Without this visibility, teams don't know what work they need to take on or when to begin work, and are unable to adapt to change or make informed tradeoffs. Executing the work presents its own set of challenges; without a clearly defined process, teams experience bottlenecks and struggle with delivering quickly.
ProjectPlace helps teams efficiently manage, prioritize, and deliver high-value work. In this guide, you’ll learn how to:
- Create a shared workspace where teams collaborate in a central place
- Plan delivery schedules and keep track of important milestones, such as release dates
- Break feature sprints into task cards and assign them to team members on a shared board
- Use cards and card templates to standardize information for each task and track progress on your activities
- Schedule sprint planning and standup meetings within the context of your workspace
- Use metrics to provide insight into the team's processes and uncover ways to improve as a team
TIP
We're here to help! If you need assistance with implementing any of the steps below, don't hesitate to reach out to your CSM.
Set Up Your Workspace
Your new workspace will give the team a central place to plan their delivery schedule, prioritize and track work, and collaborate with team members and other project stakeholders.
To set up your workspace:
-
Create a new workspace based on the Planview Product Delivery template. This template contains a pre-configured delivery schedule, board, document folders, and more.
-
If you’re using the Planview Portfolios – ProjectPlace connector, create your workspace by syncing your Portfolios project with ProjectPlace.
-
If you’re using the PPM Pro – ProjectPlace connector, create your workspace by syncing your PPM Pro project with ProjectPlace.
-
-
Invite members to the workspace. Include developers and any other stakeholders in the project, such as product managers. If you created the workspace by syncing a Portfolios or PPM Pro project, users who are a part of the project will automatically receive an email invitation to ProjectPlace when the sync is initiated and will be listed as workspace members on the Members tab once they’ve created their account.
-
Create a team and add members to the team. Setting up teams in ProjectPlace fosters the agile tenets of collaboration and collective responsibility for the work, enabling the whole team to view an overview of all their work on the Team Overview page, receive requests from others in the organization, and for people to easily communicate to the everyone on the team by @-reffing the team name.
TIP
Transparency and collaboration between team members and stakeholders is key to a successful project, but if you need to restrict access to specific tools, boards, or documents within a workspace, you can do so by using member groups.
Plan Your Delivery Schedule
The Plan tool makes it easy for everyone involved in the project to get visibility into important due dates and milestones. Creating a detailed delivery schedule that breaks down epics into smaller features enables teams to deliver value quickly. Features (represented as activities in the Plan tool) are connected to team boards, where work can be broken down into task cards.
You also have the option to create a delivery schedule in Portfolios or PPM Pro if you’re using a connected solution. The bi-directional connector makes it easy to connect your ProjectPlace cards with projects and visualize work progress in the project schedule. (If you’re using PRM or PPM Pro to plan, the project plan will be read-only on the Plan tab in ProjectPlace.)
TRY IT
Click here to launch an in-app guide that walks you through the basics of setting up a plan in the Plan tool!
Plan in ProjectPlace
If you’re using ProjectPlace to plan your delivery schedule, use the Plan tool to create activities that represent features. Later, you’ll connect activities to your team board, so progress on story or task cards is visualized in the project plan.
To set up your plan:
-
Create a hierarchy of activities. Start with creating a parent activity for the year, then break down the activity into quarters. During sprint planning, break each quarter into feature sprints as shown in the image above. You can visually group activities by using label colors to color-code activities by product area or tool (i.e. administration, time reporting) or what level they are in the hierarchy.
TIP
Struggling to plan your activities and milestones? Or prioritizing which things to work on first? Try these tips and best practices for managing backlog items and prioritizing work during sprint planning:
In the WBS, create a parent backlog activity that holds all your backlog items in your current roadmap as separate child activities. Drag the highest priority activities to the top of your list or use custom fields to assign priority to your backlog items.
Review and size backlog items collectively as a team (Tip: use custom fields to designate the size of an activity). Break them down into separate features if needed to include them in an upcoming sprint.
When you’re ready to work on a backlog activity, bring it out from under the parent backlog activity and associate it with a sprint activity in the plan. To do this, locate it in the WBS, then drag and drop under the desired parent sprint activity.
Remember that you're visualizing what work will be done at what time, so only connect the current sprint’s feature activities to the team’s board to make it easier for the team to focus on the current commitment.
-
Create milestones that represent important dates, such as release dates.
-
If you need to change the date or duration of any activities or milestones, it's easy- just drag and drop in the Gantt.
-
Use the lock date toggle to ensure that an activity or milestone's date doesn't get changed.
Plan in Planview Portfolios
If you’re using the Planview Portfolios – ProjectPlace connector, you’ll build out the project schedule (consisting of phases, activities, and milestones) in the Portfolio Resource Management application and sync it to your ProjectPlace workspace. ProjectPlace cards flow back into Planview Portfolios – PRM as action items, capturing team member progress in the project schedule. Read more here.
Plan in PPM Pro
If you’re using the PPM Pro – ProjectPlace connector, tasks are synced from the PPM Pro project to your ProjectPlace workspace. Creating new tasks in PPM Pro results in the creation of corresponding ProjectPlace activities, and resources on the project Staffing screen are added automatically to the ProjectPlace workspace Members tab. Read more here.
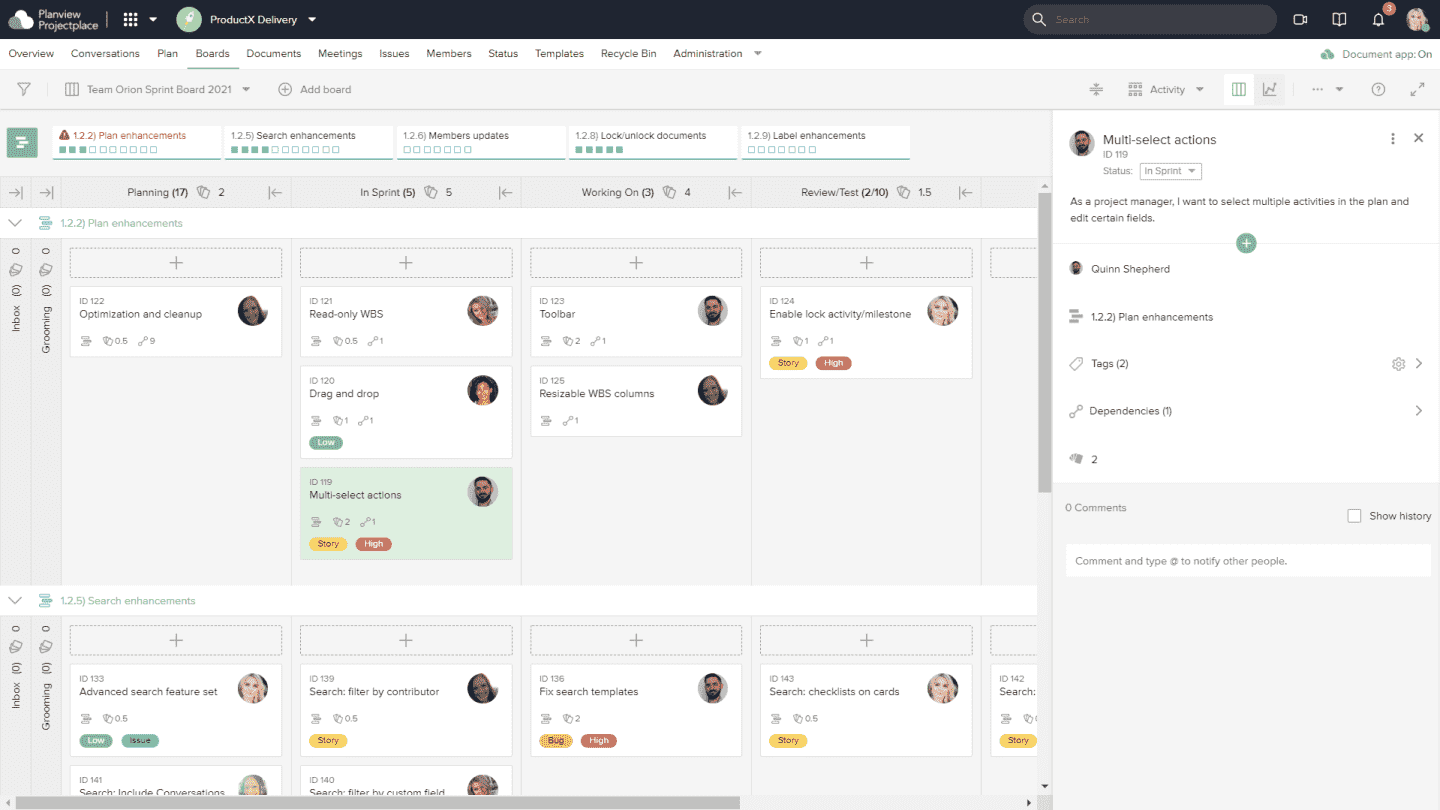
Create a Team Board
The shared board on which cards live enables the team to standardize their process, collaborate with other team members to solve problems, and keep track of their work. To make it easier for your team to use the board, we'll cover basic board setup and a few key board customization options.
To set up your team board and card templates:
-
Create a new board and give it a descriptive name (for example, Team name sprint board – year).
- Define columns that correspond with the steps in your process. Usually, software delivery cycles involve a planning process, followed by execution, testing, and deployment. Some examples of columns you might use on your team board are:
- Inbox: Ad-hoc or new requests
- Design and Grooming: Backlog cards being considered for a sprint
- Planning: Cards ready to be added to an upcoming sprint
- In Sprint: Cards not yet started but targeted for completion during the sprint
- Working On: Cards currently being worked on by the team
- Review/Test: Cards in code review or QA stage
- Failed: Cards that failed testing criteria and need more work
- Deployed/Done: Completed cards
-
Set WIP limits on columns. For example, setting WIP limits on a QA, testing, or in progress columns ensures that testers don't get overloaded with work, ensuring quality in the testing process.
Get to Work
At the start of each sprint, gather the team and review the backlog to identify which features (represented as activities in the Plan) the team will be working on during the sprint. During sprint planning, teams work together to define what needs to be done to deliver each feature, then break features into smaller tasks represented by cards, so they're able to tackle their work in short sprints and increase their velocity. Cards are assigned to team members and contain details about the work, such as who is working on the task, how long it will take to complete, acceptance criteria etc.
To start work on activities:
-
Schedule a sprint planning meeting and collaborate as a team to review the backlog and identify the features the team will be working on during the sprint. After the sprint begins, you can also use the Meetings tool to schedule daily standups within the context of your workspace.
-
When the team decides to work on a feature during the upcoming sprint, drag the activity representing that feature out from the backlog activity and associate it with the appropriate sprint activity. (hover over the backlog activity and click the handle
 that appears, then drag and drop the activity to the desired position in the hierarchy.)
-
Connect the feature activities to the team board where they will be broken down into cards and completed. Remember to only connect features the team is actively working on in the current sprint.
-
Create cards for each activity. Have each team member create cards for each work item in the corresponding activity’s detail pane, while keeping the team’s capacity in mind. Be sure to include these key details on each card:
-
Card description: Include a detailed explanation of the task.
-
Dependencies: Use dependencies to link cards when the completion of a card depends on other cards.
-
Points or Estimated Time: Estimate the size of or effort for the work. If you’re using points to estimate card size, remember that points estimation is highly individual to each team. As the team hones their estimation skills over time, they will define what the points translate to in terms of complexity and get a sense for their velocity (how many points they are likely to complete during a sprint).
-
Tags: Create High Priority and Low Priority tags, then apply them to cards to visualize priority. It’s easy to organize the board according to priority, just filter by tag.
TIP
If you prefer, you can also create cards directly on the team board. Group the board by activity and create cards under each activity swimlane.
-
-
Update card statuses as the work progresses. Each team member should update the status of their cards before standups.
-
Track progress on your activities. When cards on the board are moved to Done, the progress is visualized on the activity in the Plan. If there's still work to do on an activity (if there are incomplete cards after the due date has passed) a warning icon appears next to the item.
-
Set the activity to done when the sprint is completed and all cards have been moved to the Done column, and the cards are automatically cleared from the board. And if the team finishes work on an activity early, team members can easily see incomplete activities at the top of the board and assign themselves to unassigned cards, or get ahead of schedule by pulling in another activity to the board.
-
If you’re using the Planview Portfolios – ProjectPlace connector, set the schedule activity or milestone to complete, and the status of the corresponding ProjectPlace activity or milestone will be set to Done in the workspace plan in ProjectPlace.
-
If you’re using the PPM Pro – ProjectPlace connector, set the task's Implied Status to closed or enter a Complete Date, and the status of the corresponding ProjectPlace activity or milestone will be set to Done in the workspace plan in ProjectPlace.
-
TIP
For repeated or recurring tasks, creating card templates can help speed up the card creation process and standardize the information included on cards. You can create templates for common types of cards, such as story cards, issue cards, and bug cards
Practice Continuous Improvement
While conceptually the steps in our processes are simple to understand, in practice work often jumps between steps, gets stuck in handoffs, or otherwise sits idle. This affects the team's ability to deliver work quickly or predictably. So it’s valuable to not only identify each step in our process and visualize our work, but go one step further and actively improve our process, based on our observations of how work moves through the board. The board chart view can help you get valuable insights about the team's process and efficiency, such as:
- Cumulative Flow: Summarizes how many cards are planned, ongoing, and done for a selected period of time, or the total number of story points estimated for these cards
- Cycle Time: Measures the team's efficiency (the average number of days required for a card to be finished). It displays both the cycle time (time from starting to work on a card until it is done) and the lead time per card (time from a card is created until it is done). It also shows the average cycle time and average lead time for the selected period.
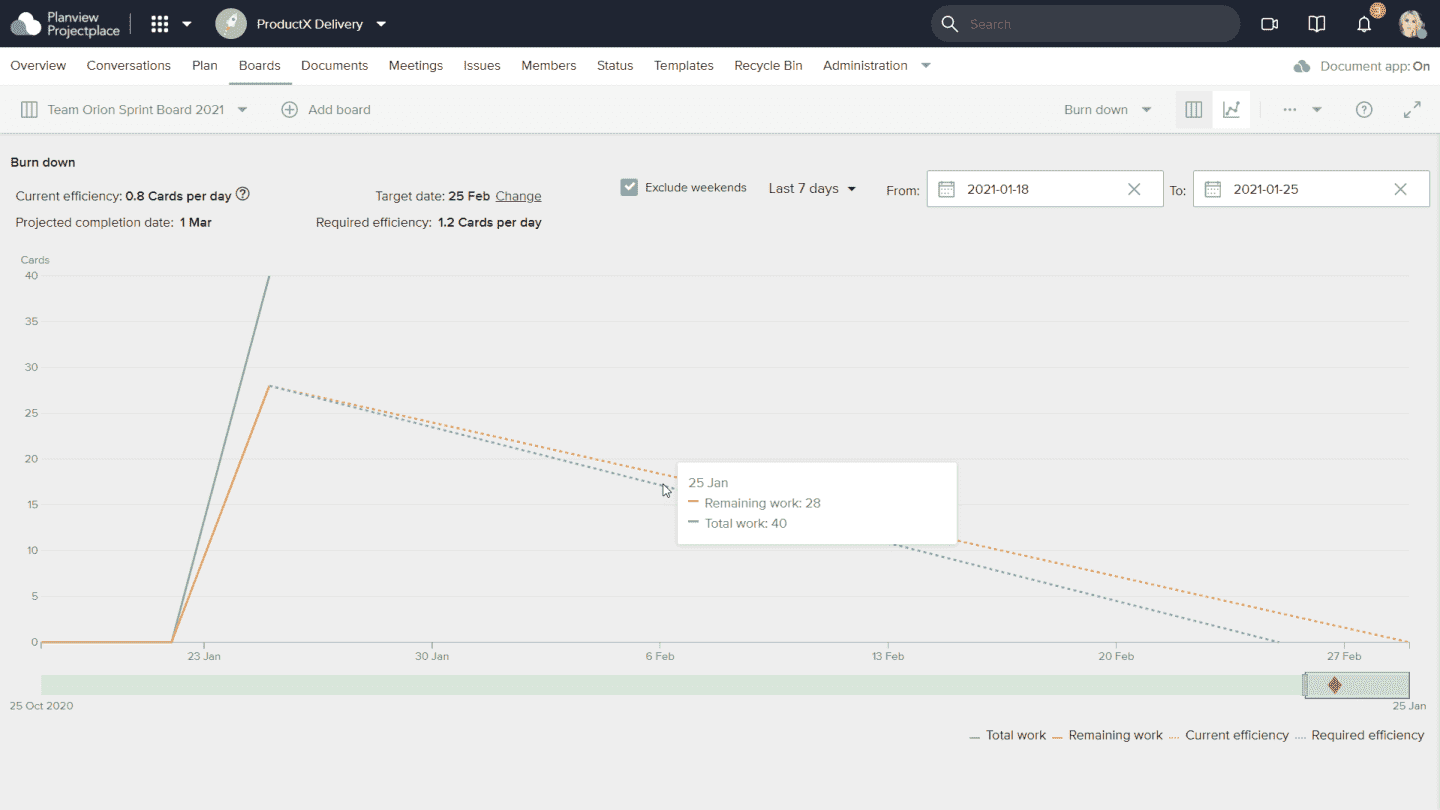
- Burndown Chart: Gives an idea of when the remaining work on the board is expected to be completed with the current efficiency.
- Burnup Chart: Displays the amount of work done in relation to the total amount of work (select the Points option to get an overview of work progress.)