
Add Or Edit PIR Items
Introduction
This article provides an overview of steps to add a new or edit an existing PIR item on the PIR Manager page.
Pre-requisite
To be able to add and edit a PIR item, you must have ‘Create PIR Item’ and ‘Update PIR Item’ User Permissions.
Navigation
PIR > Manager
Add/Edit a PIR Item
To add a PIR Item, navigate to the PIR Manager page and click  . New PIR Item dialog displays. This dialog has the following sections:
- PIR Item Information
- Additional Information
- Comments
- Analyses & Activities

To edit an existing PIR item, search the PIR item on the PIR Manager page and click its ‘Summary’ to open. The ‘PIR Item’ dialog displays.
PIR Item Information
Fill in the template as follows for this section:
| Fields | Description |
|---|---|
| PIR Item ID | System-generated field and cannot be edited |
| PIR Item Summary | Mandatory; Enter the PIR item summary. |
| PIR Item Description | Enter the item description. |
| Impacted Release | Click the drop-down and select the impacted release(s) |
| Impacted Deployment Plans | Click the drop-down and select the impacted deployment plan(s). |
| Release Owners | Cannot be edited; It is the Release Owner selected in the Release. |
| Impacted Systems | Select the impacted system(s) |
| Type | Select the PIR item type from the drop down. You can customize this field using the PIR Item - Type Customization. |
| Assigned To | Select the user or user group that the PIR Item is assigned to. |
| Did this result in an impact to service availability | Select if the PIR Item records an impact on service availability. Enter the Start Date/Time and End Date/Time. The duration will be automatically added from the start and end dates. |
| Category, Sub-Category | Select Category, Sub-Category of the PIR item from the drop-down. To customize this field, go to PIR Item - Category Customization and PIR Item - Sub-Category Customization. |
| Status | Mandatory; Select the status of the PIR item from the drop-down. To customize this field, go to PIR Item - Status Customization. |
| Theme | Select a theme from the drop-down. To customize this field, go to PIR Item - Theme. |
| External ID | Enter the external ID. |
| Attachments | Add a new URL or File as an attachment by clicking  |
Additional Information
The Additional Information tab contains custom fields, which administrators have added using PIR Items Custom Fields Customization. These fields will vary between each Plutora installation. Please consult your administrator for the procedure for filling in these fields.
To see the custom fields, you must have the permission set in PIR Items Custom Fields Customization.
Comments
- To add a comment, enter your comment in the Your comment… field. Then click
 .
. - To edit a comment, click Edit. Then click Save.
- To reply to a comment, click Reply. Enter your reply and click .
You cannot delete comments.
Analyses & Activities
In this area of the PIR Item you document the following aspects of each PIR Item:
- Impact: What effects it will have.
- Actions: Assigned tasks related to solving the problem. For example, one Action could be finding out the Root Cause of a problem and suggesting some Preventative Measures.
- Root Causes: What caused the problem.
- Preventative Measures: Measures to be put in place to prevent the problem from happening again.
To add a new Action, Impact, Root Cause, or Preventative Measure, click  . Refer to Add or Edit PIR Activity for more information on PIR Activities.
After making the required edits and additions to the PIR item, click  .
.

The new PIR item is now created. The dialog will close and the ‘PIR Manager’ page will be back to display.
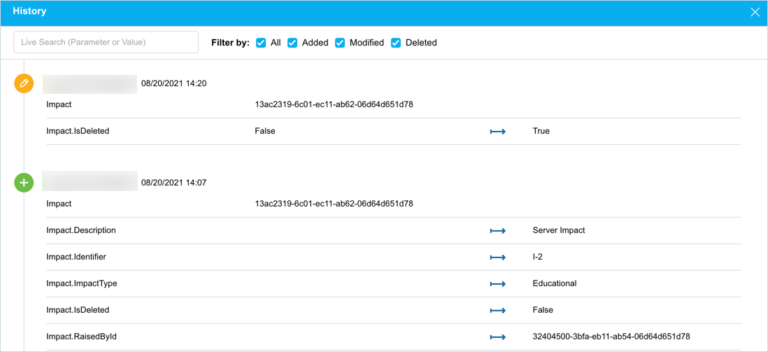
View the Audit History of a PIR Item
To view the audit history of a PIR item, click ![]() in the top-right corner. Refer to Audit History for more information.
in the top-right corner. Refer to Audit History for more information.
Copy a PIR Item’s URL
To copy a PIR Item’s URL to the clipboard, click  in the top-right corner. For more information, see Copy to Clipboard.
More Information
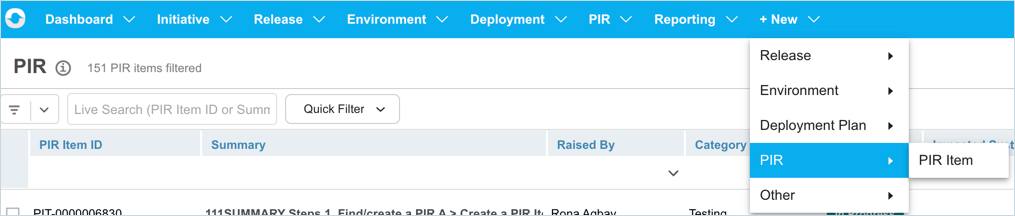
Add PIR Item via ‘+New’
To add a new PIR item via ‘+New’, go to + New > PIR > PIR Item. This will open the ‘New PIR Item’ dialog. Proceed with filling up the PIR item details (refer to the fields and descriptions listed above).
PIR Item Workflows
PIR Items can have workflows. You can create a sequence of PIR item statuses for each PIR Type, from an initial status to an end status.
PIR Item External ID
Once you add an External ID to the PIR Item,  becomes clickable.
Clicking this button displays the ‘Set Entity URL’ dialog, paste a link to the relevant ServiceNow or defect management application record, and click .png?revision=1) .
.

Once saved, you can open the record link in a new browser tab by clicking  .
.