
Manage User Groups
Introduction
User Groups allow multiple Users at once to be assigned to TECRs and other elements of Plutora. User Groups feature enables you to:
- configure email notifications to notify assignees or Stakeholders of an entity and if the assignee or Stakeholder is a Group, all users within that group will receive the notifications
- assign user groups as Stakeholders of a Release or Deployment Plan and all users within that group can have activities assigned to them
- set user groups to be ‘Environment Booking Approvers’ for any particular system and only users within that Group can approve bookings for that system.
- set workflow rules where only a selected user or user group can progress to a particular status in the workflow. If its a user group, then all users within that group can progress the workflow
This article provides an overview of steps to add and manage User Groups in Plutora.
Pre-requisite
You must have ‘Admin’ User Permissions to be able to add and manage User Groups.
Navigation
Settings  > User Management
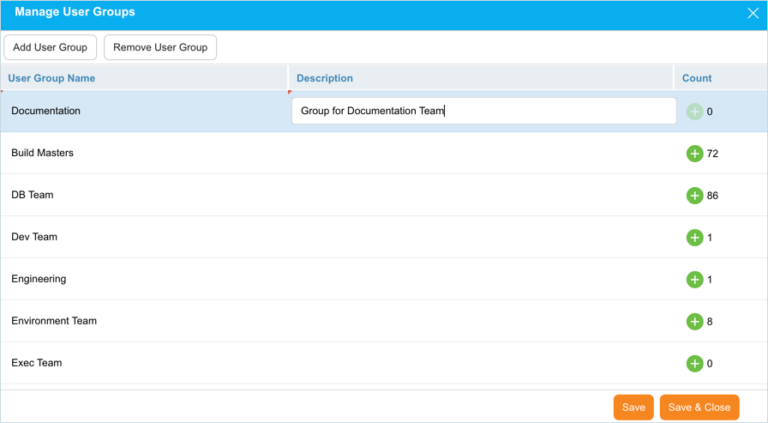
Add/Edit a User Group
To add or edit a User Group:
- Navigate to ‘User Management’ page.
- Click
 . ‘Manage User Groups’ dialog displays.
 - Click
 . A new line is added for the new user group.
 - Enter the User Group Name.
- Enter the Description for the user group.
- Click
 .
.
To edit an existing user group, double click on User Group Name and Description and make edits as required.
The next step is to add users to this new group.
Add Users to the Group
To add a user(s) to the user group, click  .
.
On the ‘Bulk Update’ dialog select Users from the drop-down. You can also select User Roles from the Roles drop-down.
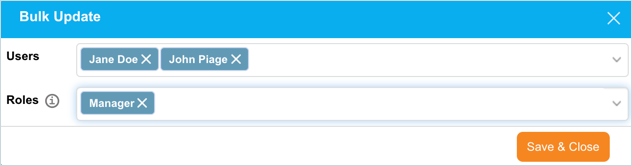
To remove a user or role click ![]() .
.
Click  to save the changes made.
The ‘Manage User Groups’ dialog will be back to display. The column ‘Count’ displays the number of users added to the respective User Group.
Select on the ‘Manage User Groups’ dialog to save and exit. Log out of Plutora and log back in to use your new user group.
Remove (or Delete) a User Group
- On the ‘User Management’ page, click
.png?revision=1) .
. - On the ‘Manage User Groups’ dialog select a user group.
- Click
 .
. - Click
 on the confirmation prompt.

The system deletes the selected User Group. Click to save the changes and close the ‘Manage User Groups’ dialog.