
Manage Release Activities
Introduction
The ‘Activities’ feature enables you to add and manage Activities and Criteria in a Release.
An Activity is a defined action with an output. Activities are assigned against a Phase within a Project and are assigned to individuals with due dates and measurable KPIs. Whereas, Criteria are an exit or entry decision point. Criteria are assigned against a Gate within a project and are assigned to individuals with due dates and measurable KPIs.
Pre-requisite
To manage Activities/Criteria, you must have the following user permissions:
- Release Activities
- Create Activity
- Delete Activity
- Update Activity
- Update Activity Release Framework
- Update Activity Due Date
Navigation
Release > Manager
Access ‘Activities’ tab
To access the Activities tab:
- Navigate to the ‘Release Manager’ page.
- Ensure that the Release toggle button is selected.
- Search for the Release on which you want to manage the Activities. You can use the filter options available on this page.
- Open the Release by clicking on the Release ID or Release Name.
- Click on the Activities tab.
The existing Activities/Criteria (if any) are displayed here.

Activities are represented by  and Criteria are represented by
 .
.
Total Activities Summary
The progress bar shows the total number of Activities/Criteria available in the Release and % of completion.

Filter Options
Hide Phase/Gate/Dependent Child
Hide or unhide Activities (Phases) and Criteria (Gates) by clicking  and
and  . To hide Activities and Criteria belonging to the child Releases click
  .
.
Filter by Status
Click on the status link to filter by status.

Filter by Assignee
Select a name from the Filter by Assignee drop-down menu to show only the Activities and Criteria assigned to that entity.

Filter by Phase/Gate
The Phases/Gates, that are added to the Release, are listed on top of the Activities grid. Clicking on a Phase/Gate displays Activities/Criteria that belong to the respective Phase/Gate.

The first Phase/Gate from Release, which is not marked as complete, will display  to indicate that it is in progress.
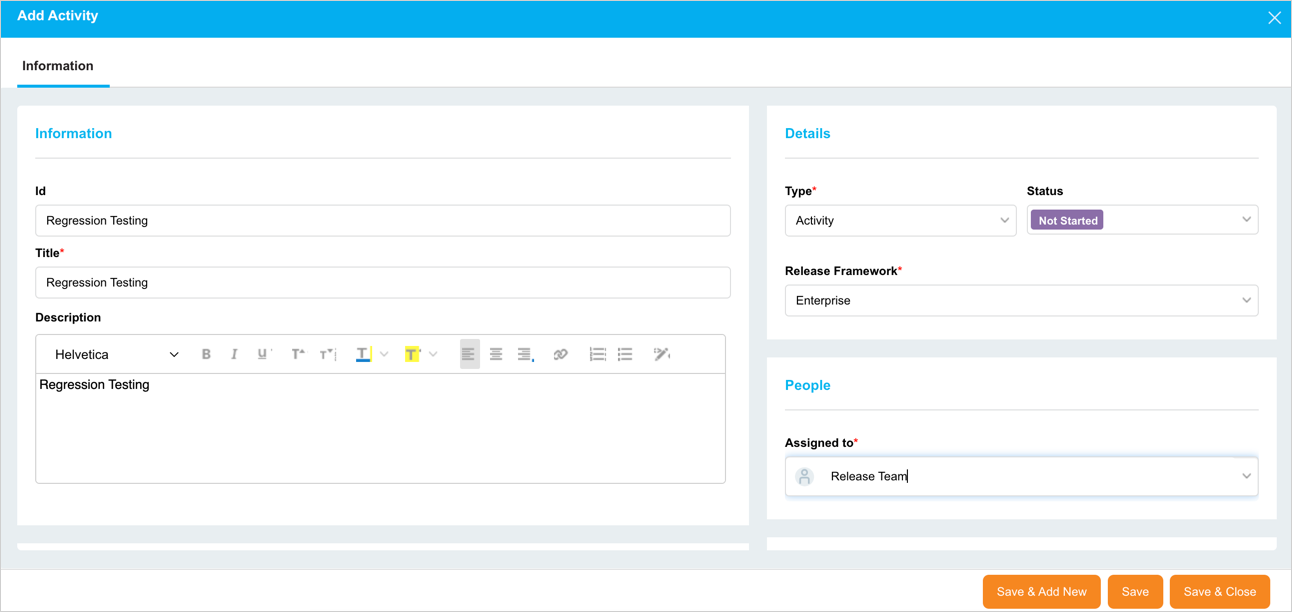
Add Activity/Criterion
To add a new Activity/Criterion:
- Click
 .
. - Select Activity or Criterion from the drop-down.
- ‘Add Activity’ or ‘Add Criterion’ pop-up displays based on your selection. Fill in the template as follows:
‘Information’ Section
| Fields | Description |
|---|---|
| Id | Enter an Id for the Activity/Criterion. |
| Title | Mandatory; Enter a title. |
| Description | Free text; Enter Activity/Criterion description. |
‘Dependency’ Section
Add and manage dependency between the Activities/Criteria in this section. For details, see Add Dependency.
‘Additional Information’ Section
This section contains custom fields and tabs, which administrators have added using the Release Activity Custom Fields and the Release Activity Custom Lists Customizations.
These fields vary between each Plutora installation. Please consult your administrator for the procedure for filling in these fields.
‘Details’ Section
| Fields | Description |
|---|---|
| Type | Select a type. |
| Status | Select the status from the drop-down. |
| Release Framework | Visible only in Enterprise Release Activity/Criterion;
For further details, see Release Framework |
‘People’ Section
Select a Stakeholder from the Assigned To drop-down menu. Only Stakeholders selected under the Stakeholders tab appear here.
‘Date & Time’ Section
| Fields | Description |
|---|---|
| Assigned to Phase/Assigned to Gate | Select a Phase (for Activity) or Gate (for Criterion) from the drop-down. |
| Forcast Date | Select a forecast date. |
| Start Date | Select the Activity/Criterion start date. |
| Due Date | Mandatory; Select the due date. |
| Completed Date | Completed Date will fill automatically once the Status ‘Completed’ is selected. |
| Actual Completed Date | Select the Actual Completed Date if it is different from the Completed Date. This field is disabled if the ‘Enable Actual Completed Date’ is not selected in Release Setup Customization. |
‘Attachments’ section
You can attach URLs and/or Files. To add a new attachment:
- Click
 .
. - Select Add URL or Add File.
- In the case of a URL, the ‘Add URL’ pop-up displays. Enter the URL in the field and click
 . In the case of a File, select an attachment file and click Open.
The selected URL or file display in the ‘Attachment’ section.
- To view an attachment, click
 next to the attachment.
 - To delete an attachment, click X next to the attachment.
- To download a file attachment, click
 next to the attachment.
After making all the entries on this pop-up, click  . The Activity/Criterion will be saved and available on the grid.
NoteTo continue adding more Activities/Criteria, click .
Release Activity Dependenc
You can add dependency between the Activities/Criteria using the ‘Dependency’ feature. The Activities/Criteria can have dependencies on the other Activities/Criteria within the same or different Release that belong to the same parent Release.
Using this feature, Plutora restricts you from changing the status of the successor Activity/Criterion to ‘In Progress’ or ‘Completed’ unless all the preceding Activities/Criteria are resolved (i.e have a status Completed or N/A).
In case of unresolved dependencies, the options ‘In Progress’ and ‘Completed’ in the Status drop-down will be disabled. It allows you to manage the status of the Activities/Criteria by ensuring that the preceding Activity/Criterion has been finished (with status Completed or N/A) before you start working on the succeeding Activity/Criterion.

Add Dependency
To add a dependency:
- Click and open an Activity/Criterion on the ‘Activities’ tab to display the ‘View/Edit Activity’ (or ‘View/Edit Criterion’) pop-up.
- Under the ‘Information’ tab scroll down to the ‘Dependency’ section and click
 .
. - The ‘Add Dependency’ pop-up displays. Fill in the fields:
| Fields | Description |
|---|---|
| Release | Select a Release from the drop-down to create a dependency. Only the Releases that belong to the same parent Release will be available for selection. |
| Dependency Type | Disabled; Only ‘Finish to Start’ dependency is available. |
| Phase / Gate | Select a Phase/Gate to filter the relevant Activities/Criteria |
| Activity / Criterion | Select one or more Activities/Criteria from the drop-down. |
- Click .
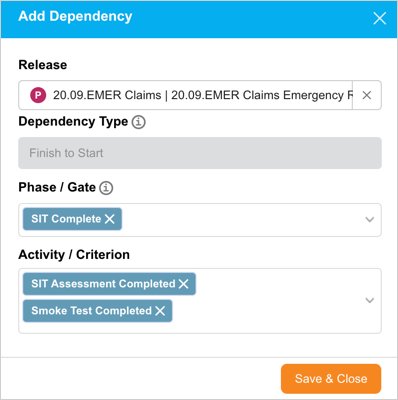
The ‘View/Edit Activity’ (or ‘View/Edit Criterion’) pop-up will be back to display and the selected Activity/Criterion will be added to the ‘Dependency’ section. The count next to the ‘Dependency’ title represents the total number of dependencies added to this Activity/Criterion.
NoteIf you are adding the dependency to a new Activity/Criterion, will be disabled. In that case, click  on the pop-up. This will enable the button.

Remove Dependency
To remove a dependency, hover and click X
next to the dependency. A pop-up displays for your confirmation. Click  .
.

NoteYou can track the added and removed dependencies in the Audit.
Edit Activity/Criterion
Edit the following fields directly from the grid:
- Activity ID: Click the cell to edit the field.
- Title: Click the cell to edit the field.
- Status: Select a status from the cell drop-down.
- Assigned To: Select a User who is a Stakeholder, a User who is a member of a User Group which is a Stakeholder, or a User Group that is a Stakeholder.
- Phase/Gate: Select from the list of Phases and Gates within this specific Release.
- Forecast Date/Start Date/Due Date: Select the dates as per the requirement. Updating Due Date requires the ‘Update Activity Due Date’ user permission.
Click on the Title to open the Activity/Criterion ‘View/Edit’ pop-up. Here, you can update the fields as per your requirements. Refer to the above section for details.
For Dependent Activity/Criterion
Updating the Due Date of an Activity/Criterion, that has one or more successor Activity/Criterion, to a future date enables you to shift the Start Date, Due Date, and Forecast Date of all the successor Activities/Criteria. In this case, a pop-up displays the list of the successor Activities/Criteria. Clicking  shifts all the dates to the same period.

‘Comments’ Tab
The Comments tab allows you to add a comment and answer other users’ comments.
- Add a comment: Type your comment into the Enter Comment Here field and click
 .
. - Edit a comment: Click Edit on the comment. Then edit the comment and click
 .
. - Delete a comment: Click Delete on the comment. Then click
.png?revision=1) on the confirmation prompt.
on the confirmation prompt. - Reply to a comment: Click Reply and enter your reply comment in the Enter comment here field and click
 .
.
After making the required changes, click .png?revision=1) .
.
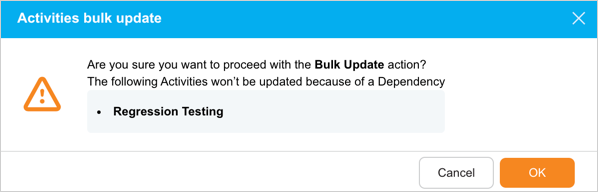
Bulk Update Activities
To bulk update Activities/Criteria:
- Select two or more Activities/Criteria from the grid.
- Click
 .
. - Click Bulk Update.
- ‘Bulk Update’ pop-up displays. Update the fields. For details on these fields, see Add Activity/Criterion section.
- After updating the required information, click
.png?revision=1) .
.

The Activities/Criteria will appear on the grid with the updated details.
For Dependent Activities/Criteria
During Bulk Update, if the selected Activities/Criteria have a dependency and the dependent Activities/Criteria are not included as part of the Bulk Update, then on selecting.png?revision=1) , Plutora will display a notification to confirm your actions with the details about the dependent Activities/Criteria.
, Plutora will display a notification to confirm your actions with the details about the dependent Activities/Criteria.
In this case, the status of the Activities/Criteria with resolved dependency (or no dependency) will be updated, and the status update of those with unresolved dependency will be aborted.
Duplicate Activity/Criterion
You can create a new Activity/Criterion using the ‘Duplicate’ feature. To duplicate:
- Select one or more Activities/Criteria on the grid.
- Click
.png?revision=1) .
. - Click Duplicate Activities.
- On the ‘Duplicate Activities’ pop-up, select a location.
- Use Current Release: Plutora creates the duplicated Activities/Criteria in the current Release.
- Use Different Release/s: Select Release ID(s) or Release Name(s) from the drop-down and Plutora will create the Activities/Criteria there.
- Click
 .
.

The Activities/Criteria are duplicated and available on the grid.
Delete Activity/Criterion
To delete Activity/Criterion:
- Select one or more Activity/Criterion on the grid that you want to delete.
- Click
.png?revision=1) .
. - Click Delete.
- Click
.png?revision=1) on the confirmation prompt.
on the confirmation prompt.

Plutora will delete the Activity/Criterion and won’t be available on the grid.
Import Activity/Criterion
Import from XLS:
- Click
 .
. - Select Download Template.
- Open the template in Microsoft Excel and add Activities/Criteria to it.
- After updating the .xls file, again click and select Import from XLS.
- Select the Excel file and click Open. The template will upload.
Common error messages:
- Title is mandatory: Title column data is missing. This error message can also occur if a cell outside the main rows contains data by mistake.
- Assigned To not found: Check that the Stakeholders mentioned in the Assigned To column in the Excel file match Stakeholders that already exist in the Release.
- Phase or Gate not found: Check that the Phases or Gates mentioned in the Phase or Gate column in the Excel file already exist in the Release.
Import from another Release:
- Click .
- Select Import from Release.
- On ‘Import Activities’ pop up, select the Release to copy Activities from by selecting Release ID or Release Name from the drop-down.
- Select the Import ‘Assigned To’ and ‘Phase/Gate’ values checkbox to import Assigned To Stakeholder and Phase/Gate data. To import ‘Assigned To’ and ‘Phase/Gate’ values, both Releases must have the same Stakeholders, Phases, and Gates.
- Click
 .
.
Common error message:
- Assigned To not found: Check that the Stakeholders mentioned in the Assigned To column in the Excel file match Stakeholders that already exist in the Release.
Export Activity/Criterion
To export the Activities/Criteria, Click and select Export to XLS from the drop-down menu. Your Excel file should start downloading immediately. If it doesn’t, check your pop-up blocker settings.
Save the file to your hard drive if prompted.
Child Push Activity/Criterion
Child Push functionality is available in Enterprise Release only. This functionality enables you to push (copy) the Activity/Criterion to the child Releases. If the child Release already consists of the Activity/Criterion that you want to push, its data will be updated, and you will lose the edits made.
Pre-requisite
- To be able to push an Activity/Criterion to child Releases, you must have the Enable Enterprise Activities Child Push functionality checkbox selected in Release Setup Customization.
 button is visible only on a saved Activity/Criterion. So, once you have finished adding an Activity/Criteria, reopen it again to push (copy) to the child Releases.
- You can do a Child Push only if the Release Framework for the Activity/Criteria is ‘Child’ or ‘Enterprise & Child’. For the ‘Enterprise’ Release Framework, button is disabled.
Child Push
To do a Child Push:
- On the ‘Activities’ tab search and identify the Activity/Criteria you want to push.
- Click the Activity ID or Title to open the View/Edit pop-up.
- If the Release Framework for this Activity/Criteria is ‘Child’ or ‘Enterprise & Child’, is enabled. Click .
- On the ‘Are you sure’ pop-up, select the attributes you want to push to the child Releases.
- Click
.png?revision=1) .
.

A pop-up with a list of Child Push updates displays stating the updated and new content.

NoteYou cannot push an Activity/Criteria to the child Release if the ‘Ignore Child’ checkbox is selected for the associated Phase/Gate in the ‘Phases and Gates’ panel. If you select in this case, Plutora displays a pop-up stating the Phase/Gate has been ignored from the Enterprise level. You need to uncheck the 'Ignore Child' checkbox to be able to Child Push.

More Information
Release Framework – Enterprise/Child/Enterprise & Child
| Enterprise | Child | Enterprise & Child | |
|---|---|---|---|
| Applicable | Meant for the Enterprise Releases only. | Meant for the child Releases only. | Meant for the Enterprise and child Releases. |
| Child Push | Cannot push to a child Release. will be disabled. |
Can push to child Releases if the Enable Enterprise Activities Child Push functionality is selected in Release Setup Customization. | Can push to child Releases if the Enable Enterprise Activities Child Push functionality is selected in Release Setup Customization. |
| View/Edit | Visible and editable only in the Enterprise Release. | Can edit in the Enterprise Release (the Status will be N/A). Can edit in the child Release if the Release Dependency Association is not selected in Release Setup Customization. |
Can edit in the Enterprise Release (the Status will be N/A). Can edit in the child Release if the Release Dependency Association is not selected in Release Setup Customization. |