
Add/Edit Release
Introduction
You can create three kinds of releases in Plutora:
- Enterprise Release: An Enterprise Release is used to group multiple project releases under one Release (for example, a release that affects systems across multiple portfolios that have dependencies). Changes cannot be assigned to Enterprise Releases, only to the child Project Releases.
- Project Release: Project Releases are intended to be child Releases of an Enterprise Release, although they can also stand alone.
- Independent Release: Independent Releases are used to represent independent, normally low impact, releases that have no dependencies.
See Introduction to Release Manager for how to filter and find releases in the Release Manager grid. There are two ways to create a release:
This article provides an overview of steps to add and edit a release in Release Manager from scratch. The steps to add Enterprise, Project, and Independent Release are similar with minor differences. To know how these differ from each other, see Enterprise vs Project vs Independent Release.
To add a release template, see Add/Edit Release Template.
Pre-requisite
You must have the relevant user permissions to add/edit a Release.
| Release Type | User Permission |
|---|---|
| Enterprise | To add: Create Enterprise Release To edit: Update Enterprise Release |
| Project | To add: Create Project Release To edit: Update Project Release |
| Independent | To add: Create Independent Release To edit: Update Independent Release |
Navigation
Release > Manager
Add a Release from Scratch
To create a release from scratch:
- Navigate to the ‘Release Manager’ page.
- Ensure that the Release toggle button is selected then click

- Click the release type that you want to create from the drop-down.
- The ‘Release’ pop-up displays. Fill in the fields as follows to create a new Release.
Release Tab
‘Information’ section
| Fields | Description |
|---|---|
| ID | Mandatory; Enter the Release ID. |
| Name | Mandatory; Enter the Release name. |
| Description | Free text; Enter a description for the release. |
‘Details’ Section
| Fields | Description |
|---|---|
| Type | Select a release type from the drop down. You can customize Release Type using Release Type Customization. |
| Scheduler Color | Auto populates based on the release type selected. You can change the color from the drop-down. |
| Portfolio Association | Mandatory; Select a portfolio association. To manage a portfolio association, see Organization Structure |
| Status | Mandatory field and visible only while editing. Select a status from the drop-down. To manage release status, see Release Status Customization. |
| Risk Level | Mandatory; Select from the drop-down. To manage Risk Levels, see Release Risk Level Customization. |
| Location | Enter a location. |
| Release Dependency | Select a release dependency, if any. This field is editable only in Project and Independent Release. The Enterprise Releases, that are not in an 'End State', will appear to choose from. When editing this field, the 'Phase/Gates Migration' pop-up appears for you to select how the Phases and Gates and their associated Activities and Criteria need to be handled. See 'Phase/Gates Migration' options for more details. |
‘People’ section
Select an Owner from the drop-down. You can choose any user or user group as an owner. The selected owner will be added automatically under the Stakeholders tab as an ‘Accountable Stakeholder’. If you select another Owner, the previous owner will still be an Accountable Stakeholder.
‘Linked Releases’ section
Linked Releases provide a record of the relationships between other Releases, as well as a shortcut. To link a release:
- Click
 .
. - Select a relationship from the drop-down. Available relationships are ‘Relates to’, ‘Parent to’ and ‘Child of’. A Linked Release can be related and a parent, or related and a child, but it cannot be a parent AND a child.
- Click the Live Search box and select one or more Releases. Click
 to add the Linked Release.
Click  if you are adding a Release and this section is grayed out. You must have Update Release user permissions (see Pre-requisites) to add or remove the Linked Releases.
Remove a Linked Release by clicking X.

‘Date’ section
- Created On and Last Updated fields display only while editing a template. They show the Release’s created and updated date and are not editable.
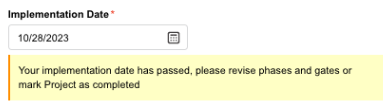
- Select an Implementation Date (Mandatory field.) Selecting an Implementation Date will also select Release Packages that correspond to that date if Release Packages have been enabled in Release Package Customization.
- If your Release Status is not in the end state, and it has an Implementation Date less than now or at least one Phase with the End Date less than now (or no Phases present at all, then validate by Implementation Date only), it will show a warning saying: Your implementation date has passed, please revise phases and gates or mark Project as completed. At the same time, if Release Grid User Settings indicates to Highlight Release as Late based on Release Implementation Date, then Phases End Date validation will be ignored for this warning. Also, if your Project or Independent Release is a ‘child’ under an Enterprise Release and has some of the shared Phases with Ignore checkbox, these Phases will be ignored in the validation too.
‘Additional Information’ section
Fill in the fields in this section. This section contains custom fields and tabs, which administrators have added using Release Custom Fields Customization. These fields will vary between each Plutora installation. Consult your administrator for the procedure for filling in these fields.
The permission to see a custom field tab is set in Release Custom Fields Customization.
‘Attachments’ section
You can attach URLs and/or Files. To add a new attachment:
- Click
 .
. - Select Add URL or Add File.
- In the case of a URL, the ‘Add URL’ pop-up displays. Enter the URL in the field and click
 . In the case of a File, select an attachment file and click Open.
The selected URL or file display in the ‘Attachment’ section.
- To view an attachment, click
 next to the attachment.
 - To delete an attachment, click X next to the attachment.
- To download a file attachment, click
 next to the attachment.
Phases and Gates Tab
This feature enables you to add phases and gates to the release. Phases are periods in a release where activities need to be completed, eg design, development, testing, deployment, etc. Whereas, Gates are milestone points in time where a criterion or approval needs to be met for the release to remain on schedule. For instructions to add and manage Phases and Gates, see Manage Phases and Gates.

NoteIf you update the Independent/Project Release with a new Enterprise Release via API, it will not remove previously inherited Phases/Gates as well as won’t inherit anything from the new Enterprise Release.
Release Manifest tab
The Release Manifest tab is available in Enterprise Release only. This tab allows you to add Project and Independent Child Releases to the Enterprise Release. For more information, see Manage Release Manifest.

Systems tab
This tab allows you to add the Systems that are impacted by or receive a regression risk from this Release. For more details to add and manage Systems in this tab, see Manage Impact Systems.

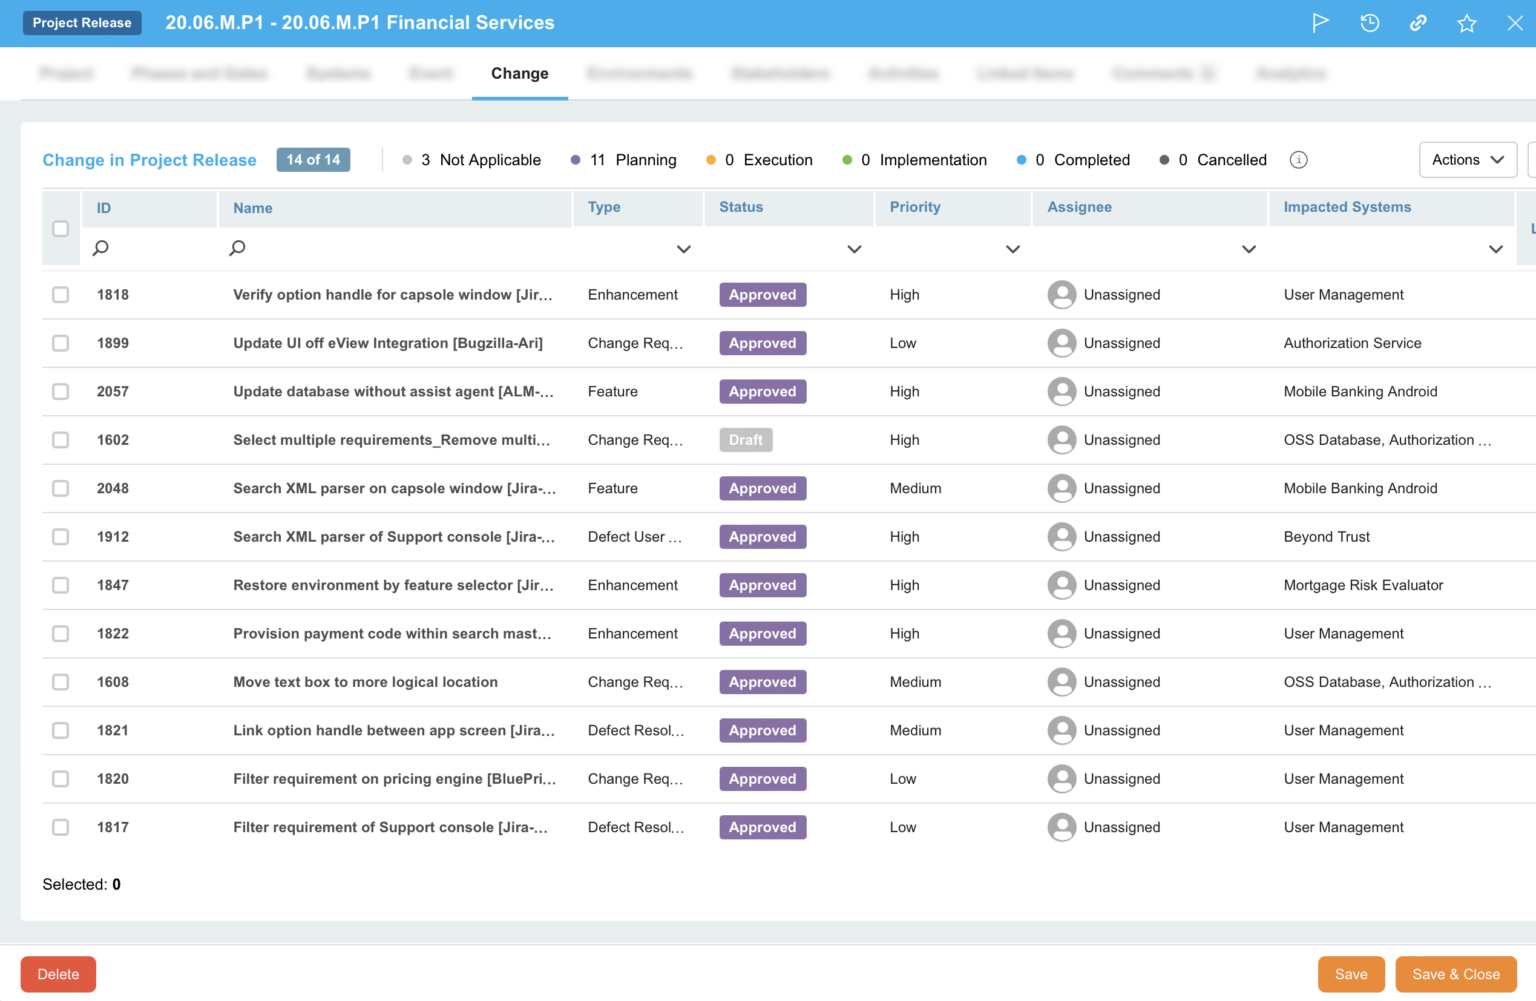
Change tab
The Change tab is available in the Project and Independent Release only. This tab displays the Changes (or user stories) linked to the Release. You can link and unlink Changes to the Release via this tab. For more details, see Manage Change.
Environment tab
In the Environment tab, you can view, add and manage the Environment Groups and Environments associated with your Release. For more information, see Manage Environments.

Stakeholders tab
Add and manage stakeholders for the Release in the ‘Stakeholders’ tab. For details, see Manage Stakeholder.

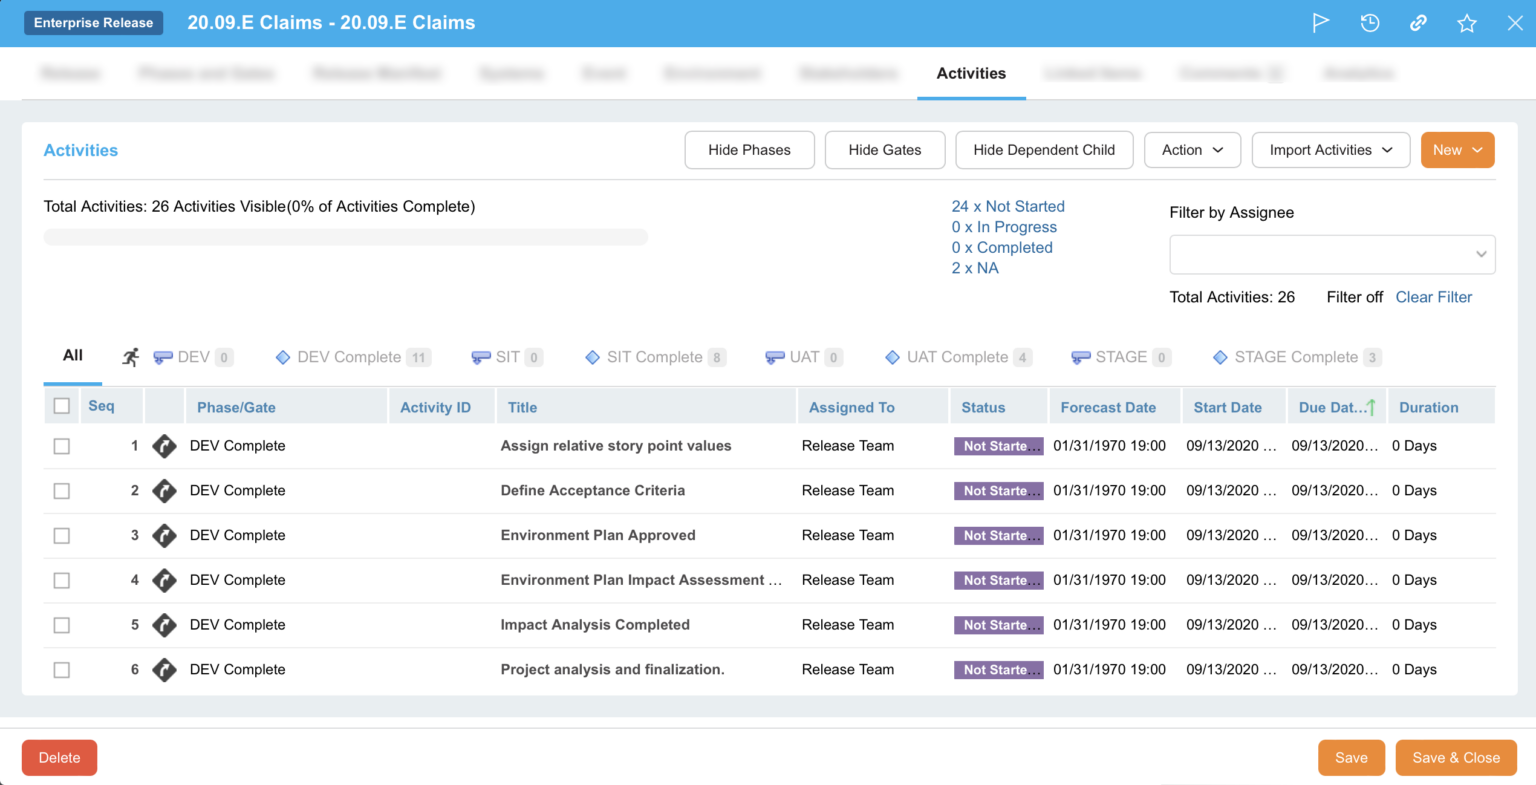
Activities tab
This tab displays the Activities/Criteria linked to the Release. To add and manage Activities/Criteria, see Manage Release Activities.
Linked Items tab
‘Linked Items’ tab is a view-only tab and is available in all the Release Type. It shows the TECRs, TEBRs, and Deployment Plans linked to the Release and their status. To view the Linked Items, click on the respective option on this tab.

Clicking on the Identifier or Name displays the respective linked item pop-up. You can filter the Linked Items displayed on this grid using the Search by Column feature.
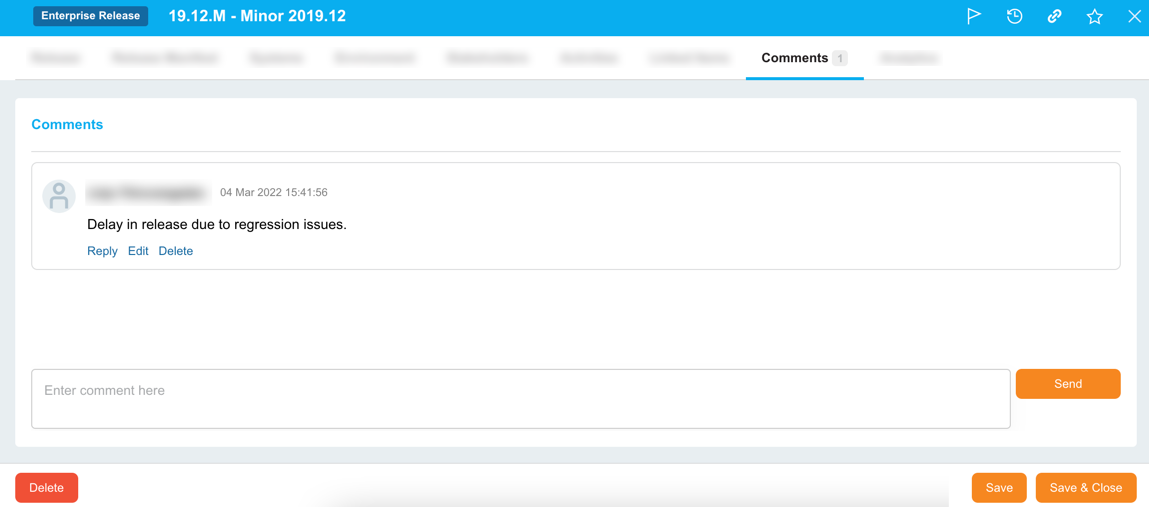
Comments tab
The Comments tab allows you to add a comment and answer other users’ comments.
- Add a comment: Type your comment into the Enter Comment Here field and click
 .
. - Edit a comment: Click Edit on the comment. Then edit the comment and click
 .
. - Delete a comment: Click Delete on the comment. Then click
 on the confirmation prompt.
 - Reply to a comment: Click Reply and enter your reply comment in the Enter comment here field and click
 .
.
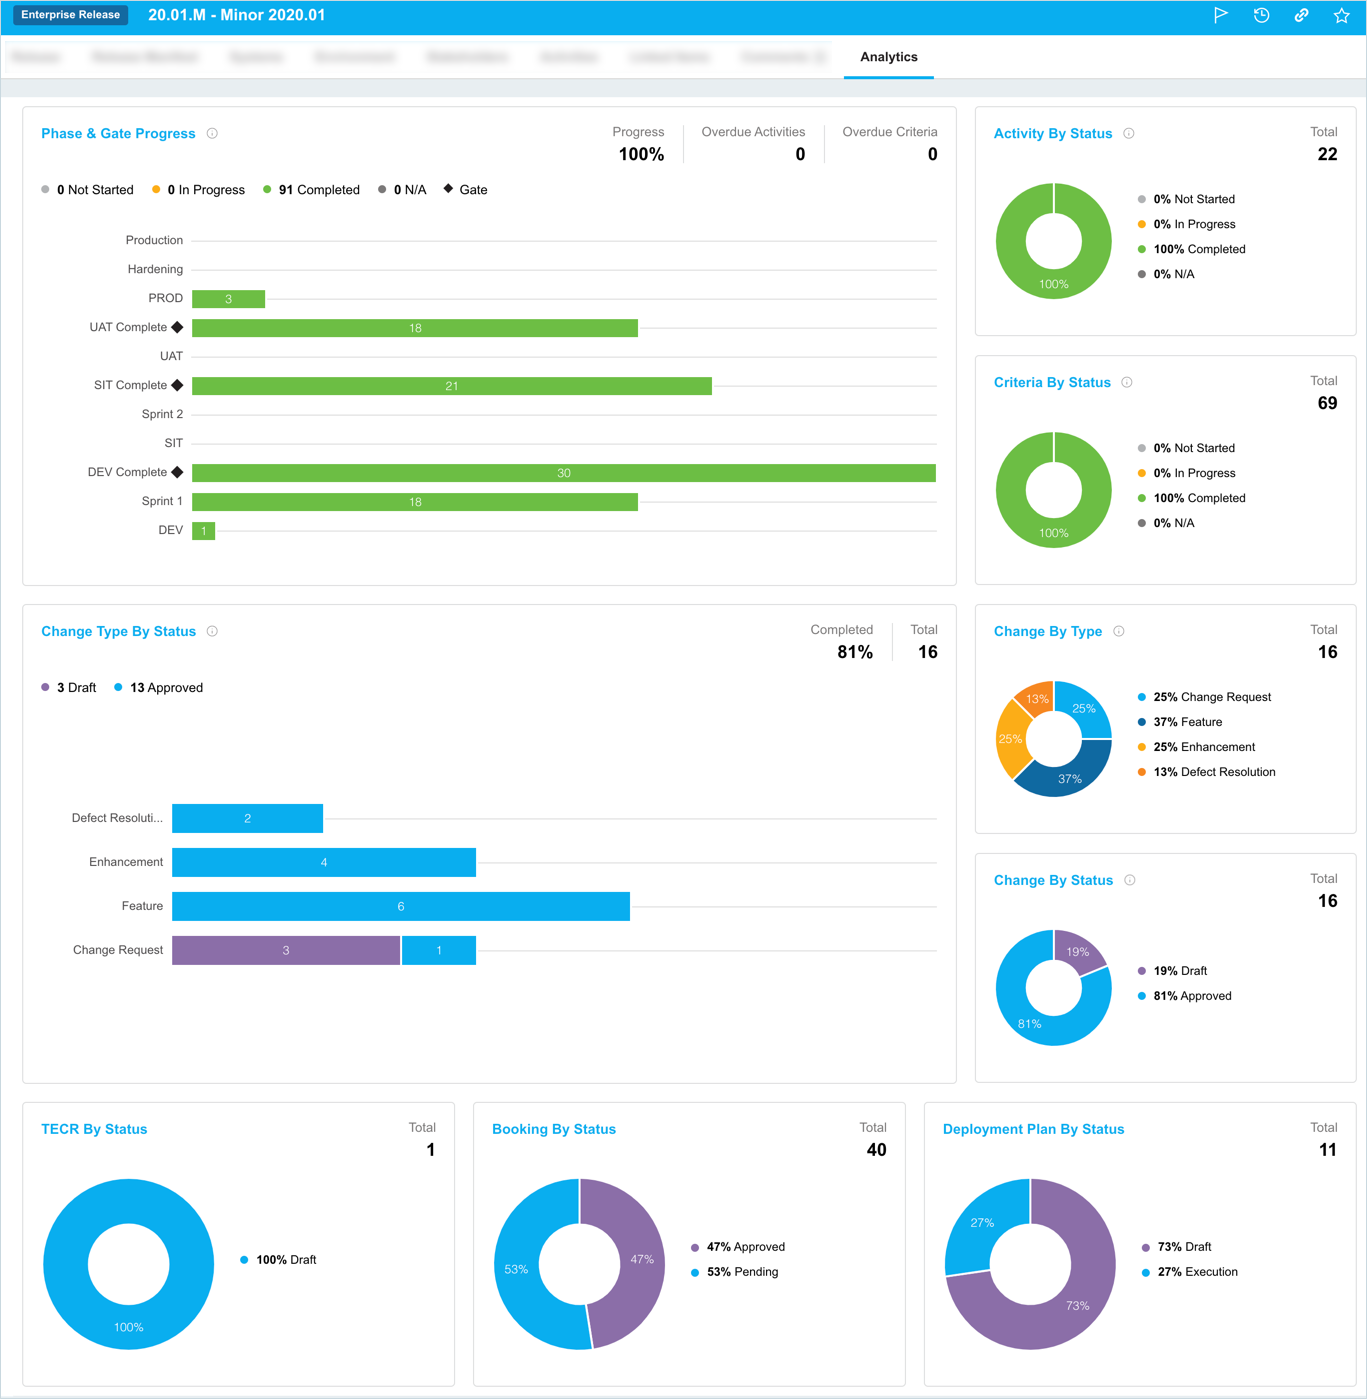
Analytics Tab
The Analytics tab, in Release Manager, provides you with a comprehensive view of the progress and status of all release activities and criteria, scope items, TECRs, Bookings, and Deployments plan within your release.
At the Enterprise release level, it provides a summary view for the Enterprise release and all Project releases within the release manifest. At the Project and Independent release level, it provides a summary view for that specific release. Refer to the Release Analytics article for details on each of the charts displayed on this tab.
After making all the required entries, click  on the Release pop-up.
The release is now added and will be available on the Releases grid. See What’s Next for the next step after creating a new release.
Edit Release
To edit an existing release, search the release on the Releases grid. For search and filter options, see Search and Filter Options on Release Manager. Click on the Release ID or Release Name to open and edit the release. For details, see the above sections.
What’s Next
The next step after creating a new release is to add and manage Phases and Gates to the release.
More Information
Enterprise vs Project vs Independent Release
| Enterprise Release | Project/Independent Release | |
|---|---|---|
| Purpose | An Enterprise Release is used to group multiple project releases under one Release (for example, a release that affects systems across multiple portfolios that have dependencies). | Project Releases are intended to be dependent on the Enterprise Release, although they can also stand alone and Independent Releases are used to represent independent, normally low impact, releases that have no dependencies. |
| Icon |  |
Project Release:  Independent Release:  |
| Relation | Acts as a ‘Parent’ Release to the Project and Independent Release | Acts as a ‘Child’ Release if linked to the Enterprise Release. Also known as ‘Non-Enterprise Release’. |
| Release Manifest tab | The Release Manifest tab allows you to add Project and Independent Releases to the Enterprise Release. | Release Manifest tab is not available. |
| Changes tab | Changes cannot be assigned to Enterprise Releases. | You assign changes to Project/Independent Release which, in turn, can be linked to the Enterprise Release. |
| Child Push | Child Push feature creates a duplicate of the selected Phase/Gates and associated Activities/Criteria in the Child Release | You cannot push Phases/Gates from Project/Independent Release to Enterprise Release. |
| Ignore Child | ‘Ignore Child’ feature, when checked, ignores the duplicated Phase/Gate in the Child Release. | You cannot control the Enterprise Release Phase/Gate from the Child Release. |
| Phase/Gate name | You can centrally change the Phase/Gate name, that is pushed to the Child Release, from here. | You cannot update the Phase/Gate name that is pushed from Enterprise to Child Release. |
| Environment Bookings | There is no limitation in booking the Environments. | Only those Environments whose system is linked to the respective Child Release is available for booking. |
| Release Framework | Mutilple Release Framework options available for Activities:
|
Standard Framework for Activities. |
Manage Release Workflow
Workflows allow you to control the way Releases are processed. Using the Release Status Customization, you can set:
- The sequence of Release Statuses for each Release Type.
- The User Groups or User Roles that have the permission to update each Release Status.
For instance, a Release Type might have a workflow based on the Release Statuses: Draft > Active > Complete. All the User Roles might have permission to change the Release Status from Draft to Active, but only a ‘Manager’ User Role might have permission to change the Release Status from Active to Complete. This workflow allows managers to check each Release before it is completed.
If the Enable Release Workflow checkbox is selected in Release Status Customization, you can click  to view the Release’s workflow path. Clicking
  hides the workflow.

View Audit History
View ‘Audit History’ of a Release to access the history of the events and updates associated with this Release. To view the ‘Audit History’, click  at the top-right corner of the Release pop-up. For more information, see Audit History.
Copy URL
You can share a Release’s URL by clicking at the top right corner of the Release pop-up. Then paste the URL into another application or document to be shared. For further information, see Copy URL.
Add to Favourites
You can add a Release to your Favourites. For this, click on  in the header of the pop-up. For more details, see Favourites.