Environment Custom Fields Customization
Introduction
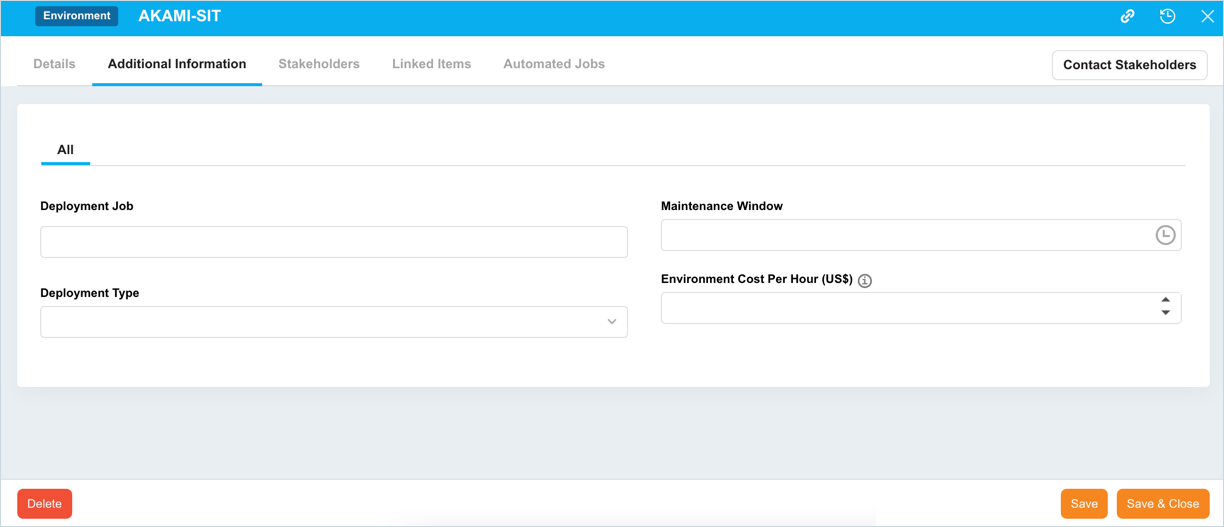
Custom Fields appear under the Additional Information tab when adding or editing an Environment on the Environment Manager page. This article provides an overview of steps to add/update the custom fields.
Pre-requisite
To be able to customize the Environment Custom Fields, you must have ‘Access Customizations’ User Permission.
Navigation
Settings .png?revision=1) > Customization > Environment > Custom Fields
> Customization > Environment > Custom Fields
Add or Edit an Environment Custom Field
To add or edit an Environment Custom Field:
- Navigate to ‘Customization’ page and click Environments.
- Click Custom Fields.
- To add a new field, click
.png?revision=1) . The system adds a line on the grid for the new field. To edit an existing custom field, search and click on the custom field from the grid and then click
. The system adds a line on the grid for the new field. To edit an existing custom field, search and click on the custom field from the grid and then click .png?revision=1) .
. - Enter/update the following details:
| Columns | Description |
|---|---|
| Value | Enter the custom field name. Custom Fields with double quotes ” " or square brackets [] in the Value cannot be added to Plutora Analytics workbooks. |
| Description | Enter a description for the field. |
| Description Display | Select the description display type. As Tooltip: The description will appear as a tooltip when you hover the mouse cursor over the button beside the custom field label. Under Label: The description will appear as text under the custom field label. It will also appear as a tooltip when you hover the mouse cursor over the description. |
| Data Type | Select the Data Type of the field from the drop-down menu. For details on these data types, see Custom Field Data Type. |
| Tab Parent | Select which tab the field should appear under from the drop-down menu. |
| Group Fields | Select which group the field should appear inside from the drop-down menu |
| Field Permissions | Select the field permissions (view, edit, and hide permissions) for each field. For details, see Manage Field Permissions. |
| Mandatory | Select if the field is mandatory for users to fill in. |
- Click
.png?revision=1) .
.
Add, Edit or Delete Tabs
To manage custom field tabs on the ‘Additional Information’ tab on the Environment dialog:
On the ‘Customization’ page, navigate to Environment > Custom Fields. Click .png?revision=1) . ‘Add/Edit Custom Field Tabs’ display.
. ‘Add/Edit Custom Field Tabs’ display.

- To add a tab: Click
.png?revision=1) and enter the new tab name.
and enter the new tab name. - To edit a tab: Double click the tab that you want to edit and make changes.
- To delete a tab: Select the tab that you want to delete and then click
.png?revision=1) .
.
Add, Edit, or Delete Groupings
To manage custom field groups on the Additional Information panel on the Environment dialog:
On the ‘Customization’ page, navigate to Environment > Custom Fields. Click .png?revision=1) . ‘Add/Edit Custom Field Grouping’ display.
. ‘Add/Edit Custom Field Grouping’ display.
- To add a grouping: Click
.png?revision=1) and enter the new grouping name. Double click the Color column and select a color from the drop-down menu or enter a Hex value.
and enter the new grouping name. Double click the Color column and select a color from the drop-down menu or enter a Hex value. - To edit a grouping: Double click, then edit the grouping. Double click the Color column and select a color from the drop-down menu or enter a Hex value.
- To delete a grouping: Click to select the grouping. Click
.png?revision=1) .
.
Close the pop-up by clicking the X at the top-right corner. You can view the changes by clicking the Group Fields column.
Bulk Update Permissions
To update the permissions of two or more Environment Custom Fields at once:
- On the ‘Customization’ page, navigate to Environment > Custom Fields.
- Select two or more custom fields (check the checkboxes)
- Click
.png?revision=1) . The button will be grayed out until you select two or more checkboxes.
. The button will be grayed out until you select two or more checkboxes. - On the ‘Bulk Update Fields Permissions’ dialog, from the Select the permission type you would like to change drop-down menu select an option. For detail on these options, see Manage Field Permissions.
- Select an option from the By drop-down menu. For detail on these options, see Manage Field Permissions
- Click
.png?revision=1) .
.
The system updates the permissions and the ‘Customization’ page is back to display.
Sort Environment Custom Fields
Sort Manually
Sorting Environment Custom Fields manually changes their order on the ‘Additional Information’ section.
NOTE
Refresh your browser to sort manually after sorting alphabetically.
- On the ‘Customization’ page, navigate to Environment > Custom Fields.
- Hover your mouse cursor over the sort column of the field that you want to sort.
.png?revision=1) appears.
appears. - Drag and drop the the field as you require.
- Click .

Sort by Column Header
Sorting Environment Custom Fields by column header only changes their order on the ‘Customization’ page.
To sort alphabetically on the ‘Customization’ page by column header, click on the column header. ↑ or ↓ displays indicating the ascending or descending column sort.

Sort Fields Inside Tabs
To sort the fields inside tabs:
- On the ‘Customization’ page, navigate to Custom Fields page.
- Click
.png?revision=1) . ‘Field Ordering’ dialog displays.
. ‘Field Ordering’ dialog displays. - Click the tab that you want to sort.
- Hover your mouse cursor over the sort column. appears.
- Drag and drop the field as you require.
- Click
.png?revision=1) .
.

Delete an Environment Custom Field
Deleting an Environment Custom Field will not delete it from Plutora. But it will no longer be available when creating new Environments.
To delete:
- On the ‘Customization’ page, navigate to Environment > Custom Fields.
- Select the Custom Field that you want to delete.
- Click
.png?revision=1) .
. - Click
.png?revision=1) .
.
Your changes will be saved and a confirmation message will display.
More Information
Location of Environment Custom Fields
To locate the Environment Custom Fields:
- Navigate to Environment > Manager.
- Click to open an Environment.
- The ‘Environment’ Custom Fields are located under the Additional Information tab.
Custom Field Data Types
- Date Picker: A calendar. (Date format is controlled by the Localization Customization.)
- List Field: A drop-down menu, which contains items that are created in Environment Custom Lists Customization.
- Free Text: A single line free text field.
- Time Picker: A time slider.
- Number: A number with or without decimal places. (Number format is controlled by the Localization Customization.)
- Decimal: A number with a customizable number of decimal places. (Decimal format is controlled by the Localization Customization.)
- Currency: A currency field with a $, £, € and a custom number of decimal points. (Currency format is controlled by the Localization Customization.)
- Date Time Picker: A calendar with a time slider. (Date format is controlled by the Localization Customization.)
- List Select: A combo box, which contains items that are created in Environment Custom Lists Customization.
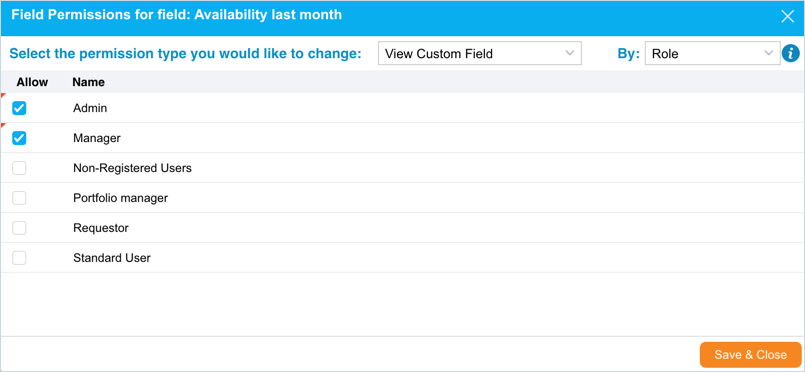
Manage ‘Field Permissions’
Field Permissions set the view, edit, and hide permissions for each field:
- Click the checkbox next to
.png?revision=1) to activate permissions.
to activate permissions. - Click . ‘Fields Permissions for field:…’ dialog display.
- From Select the permission type you would like to change drop-down menu select an option:
| Permission Type | Description |
|---|---|
| View Custom Field | Users with this permission can view and edit the field. The field is hidden from users without this permission. ‘View Custom Field’ overrides the other two permissions. If a user has ‘View Custom Field’ permission, no other users will be able to see the field, even if those other users have ‘View Value’ or ‘Edit Value’ permissions. If User 1 has ‘View Value’ permission on a field, User 2 has ‘Edit Value’ permission, and User 3 has ‘View Custom Field’ permission: The field will be hidden for User 1 and User 2, and will be locked for User 3. Remove the permissions of User 1 and User 2 to make the field editable for User 3. |
| View Value | If User 1 has the ‘View Value’ permission and no other user has been given permissions, then User 1 will be able to view and edit the field. The field will be locked (show .png?revision=1) ) and will be non-editable to users without any permissions. ) and will be non-editable to users without any permissions.If User 2 has ‘View Custom Field’ permission, only User 2 will be able to see the field. If User 1 has the ‘View Value permission’ and User 2 is given ‘Edit Value’ permission, User 2 will be able to view and edit the field and User 1 will only be able to view the field (the field will be grayed out). The field will be locked and non-editable to users without any permissions. If User 3 has ‘View Custom Field’ permission, only User 3 will be able to see the field. |
| Edit Value | If the User has this permission, they can view and edit the field. If a user has ‘View Custom Field’ permission, no other users will be able to see the field, |
- Select from the By drop-down menu:
- Individual: Select the checkboxes of one or more users.
- Organization: Select the checkboxes of one or more organizations or Portfolio Associations.
- Role: Select the checkboxes of one or more roles.
- User Group: Select the checkboxes of one or more User Groups.
- Click .