Change Workflow
Introduction
Change Workflow gives you a regular insight into what is occurring within your Change processes, the people involved, and a sense of how effectively your team meets its deadlines.
You can create workflows for each Changes Type with assigned Permission Roles or User Groups.
Pre-requisite
To be able to add and customize Change workflow, you must have ‘Access Customizations’ User Permission.
Navigation
Settings .png?revision=1) > Customization > Changes > Statuses
> Customization > Changes > Statuses
Create a Workflow
To create a workflow for a Changes Type:
- Navigate to the ‘Customization’ page.
- Click Changes.
- Click Status.
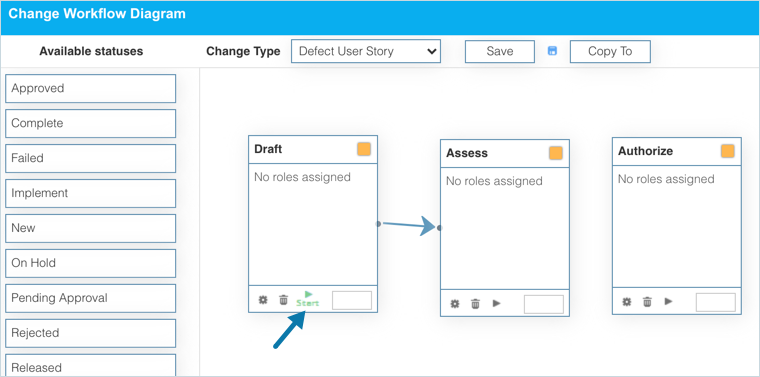
- Click Open Changes Workflow Diagram window. ‘Change Workflow Diagram’ dialog displays.

- Select a Change Type from the drop-down.
- Drag and drop statuses from the Available statuses column for the workflow.

Remove statuses from the workflow by clicking  .
.
Connect the Statuses
Make connections between status boxes by clicking and dragging  between status boxes.

Delete the connections by double-clicking them.
Set ‘Initial Status’
Set Initial Status on one status box by clicking  . Setting an initial status is mandatory. The initial status is auto-selected when you select a Type in Change Management.
The status that you set as initial, displays ‘Start’ underneath.

Set Status Order Priority
Set the order priority of the Status in the workflow or Status field by entering a number in the bottom right corner box:
- Statuses must have an order priority number to appear in the workflow or the Status field.
- Numbers must be positive integers, for example, 1, 2, 3. Zero is also acceptable.
- Numbers must be unique. For example, if you enter 1, 2, 2, 3, only one of the ‘2′ Statuses appears in the Status drop-down menu.

Change Workflow Diagram Options
Click  at the bottom of the status box to open the ‘Change Workflow Diagram Options’ dialog.
- Select an SLA Breach Time to set how much time users have to move to the next Status before it is in breach.
- Select an SLA Breach State Color from the drop-down menu.
- Select an SLA Breach State Font Color from the drop-down menu.
- Select the Permissions User Groups / Roles that may update the workflow.
Click .png?revision=1) .to move to the next Status
.to move to the next Status

Close the dialog. After making the required changes in the workflow click  .
.
Close the workflow diagram pop up by clicking the X in the top right corner. On the Customization page click .png?revision=1) . Your changes will be saved and a confirmation message will display.
. Your changes will be saved and a confirmation message will display.
Copy a Workflow
You can save time by copying workflows instead of recreating them from scratch.
To copy a workflow:
- Navigate to the ‘Customization’ page.
- Click Changes.
- Click Status.
- Click Open Changes Workflow Diagram window. ‘Change Workflow Diagram’ dialog displays.
- Click
 .
. - On ‘Copy Workflow for Change Type…’ dialog select a Changes Type from the Select Change Types drop-down menu.
- Click
 .
.

Your changes will be saved and a confirmation message will display.
More Information
While copying a workflow to another, if you select a Change Type for which a workflow exists, the following alert message displays. In this case, click  if you want to overwrite the existing workflow with the copied workflow.


