Add/Edit TECR
Introduction
Add or edit a TECR (Test Environment Change Request) when you need to update an Environment or promote a Build to a new Environment.
TECRs are used to govern changes to Environments such as:
- Code deployments
- Database Data refresh
- Infrastructure Updates
- Environment Configuration updates
- Network updates
- Server and firmware patches.
TECRs enable you to document exactly what is changing in an Environment, when it is going to happen, and whether or not there will be planned outages. It enables you to get control of non-production sites and gives everyone in your organization visibility of planned changes as well as an audit of prior changes.
This article provides you with a brief overview of the steps involved in adding and editing TECRs in the Environment.
Administrators can use Title Names Customization to customize the name of the Environment module where it appears throughout Release & Verify.
Pre-requisite
To add or edit a TECR, you must have the following user permissions:
- To view TECR grid: View TECR grid
- To add a new: Create Environment Change Request
- To edit an existing: Update Environment Change Request
Navigation
Environment > Requests
Add a TECR
To add a new TECR:
- Navigate to Environment > Requests.
- Click the TECR tab.
- Click
 . To edit an exiting TECR, see Edit a TECR.
 - The ‘TECR’ pop-up displays. Fill in the fields as follows:
Details Tab
‘TECR Details’ section
| Fields | Description |
|---|---|
| Title | Mandatory; Enter a title for the TECR |
| Release Name | Select the Release from the drop-down menu. Only Releases that do not have an End State will appear in the menu. Based on the Release you add here, you can filter Changes under the Linked Change tab. |
| Type | Mandatory; Select the TECR Type from the drop-down. You can customize the Type using TECR Type Customization. |
| Status | Mandatory; Select TECR status from the drop-down. The drop-down options depend on the TECR Type you have selected and it’s Workflow. |
| Start Date/End Date | Mandatory; Select the start and end dates for the TECR. |
| Assignee | Mandatory; Select a User or User Group from the drop-down menu. Hover your mouse cursor over the User Group to view the group members. |
| Requester | Non-editable; displays the user details who created this TECR. |
| Show on Scheduler | Check to show this TECR on the Environment Scheduler. |
| Color for the TECR | Select a color or enter the hex value. Selecting a color helps you to filter the TECR on the Scheduler. |
| Raised | Non-editable; The date when this TECR was raised. |
| Outage | Select Yes if this TECR contains an outage. This enables Outage Start and Outage End dates. Select the outage date range. You can view the TECR Outages in the Release Calendar. For more details see, TECR Outages. You can also read and update the TECR Outages from the API, see Release & Verify API. |
| Attachments | Save the TECR to add an attachment. You can attach URLs and/or Files to a TECR. Click on the number displayed to open the ‘Attachments’ pop-up. On this pop-up, you can view, add and edit the attachments. For details, see Quick Tips. |
‘Description’ section
This is a rich-text section. Enter a detailed description for the TECR.
‘Progression Path of the TECR’ section
- Click
 .
. - On the ‘Add Environment’ pop-up select the Environment or Environment Group. If you do not find the Environment/Group, ensure that the required permission. Administrators can prevent you from viewing and booking Environments and Environment Groups outside your Portfolio Association by selecting the My Portfolio Association checkbox for the Restrict Site-Wide View of Environments user permission.
- Click
.png?revision=1) .
. - The Environment/Group displays on the TECR pop-up. To add more Environment/Groups repeat the above steps.
- To delete an environment, click
 .
.

- Click Add Start Time and add a start date and time for each Environment or Environment group.
- Click Add End Time and add an end date and time for each Environment or Environment group.
- Sort Environments along the Progression Path by dragging and dropping them.
- Follow the instructions depending on your settings:
Update the Layer
Manually update Environment Components via TECR. For example, change the version number from 1.1 to 1.2:
- Click
 on each Environment.
 - Select the Host from the drop-down menu.
- Select the Layer from the drop-down menu.
- Select a layer from the Component drop-down menu.
- Type a New Component value, which will become the new version number.
- Click
.png?revision=1) .
.

Set Target Builds:
You can set the Target Build configuration for the System and multiple Subsystems for a single Environment as part of a TECR.
- Click
 on each Environment
 - Click
 to add a new row for each System or SubSystem
 - Select the Build from the drop-down menu.
- Update the Note field
- Click
.png?revision=1) .
.
If you want to configurate multiple versions of a single Subsystem running on a Environment you can add multiple Build and Notes.
To add additional Build and Notes click  icon
icon
To remove an existing Build and Note, click the icon next to the relevant Build and Note
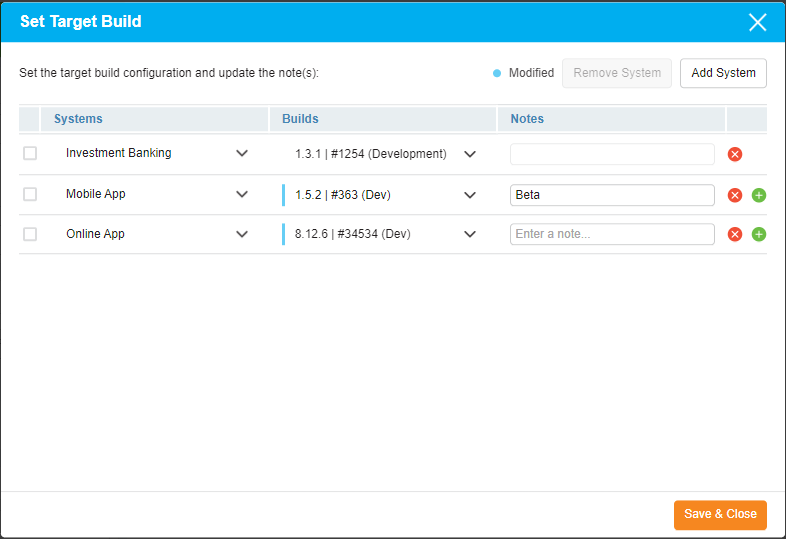
NOTE
When setting target Builds for the primary System, you cannot add additional Builds and the Notes field is not applicable
For more information, see Manage Builds
Select a Status:
You can track the progress of each Environment update within a TECR using the Status field on the Environment card. To complete an update select the ‘Completed’ status
- Once the Status on an Environment card has been set to ‘Completed’ the target component versions and target Build configuration will be applied to the Environment in Environment Manager and you will no longer be able to make any updates to the Environment card
- TECRs can be changed from ‘Completed’ status to a different status but the Environment cards within a TECR cannot be reopened.
- Administrators must have their User Role selected for each TECR Status (or the status will be grayed out; this is particularly important if no TECR workflow is enabled).

‘Additional Information’ Tab
The Additional Information tab contains custom fields, which administrators have added using TECR Custom Fields Customization. These fields will vary between each Release & Verify installation. Please consult your administrator for the procedure for filling in these fields.
If you do not find the custom field you are looking for, ensure that you have the required permission to see a custom field tab’s fields. The permission is set in TECR Custom Fields Customization.)
Linked Change Tab
The ‘Linked Change’ tab allows you to keep track of the Changes linked to this TECR. You can link and unlink Changes to the TECR via this tab. For more details, see Manage Linked Change to TECR.

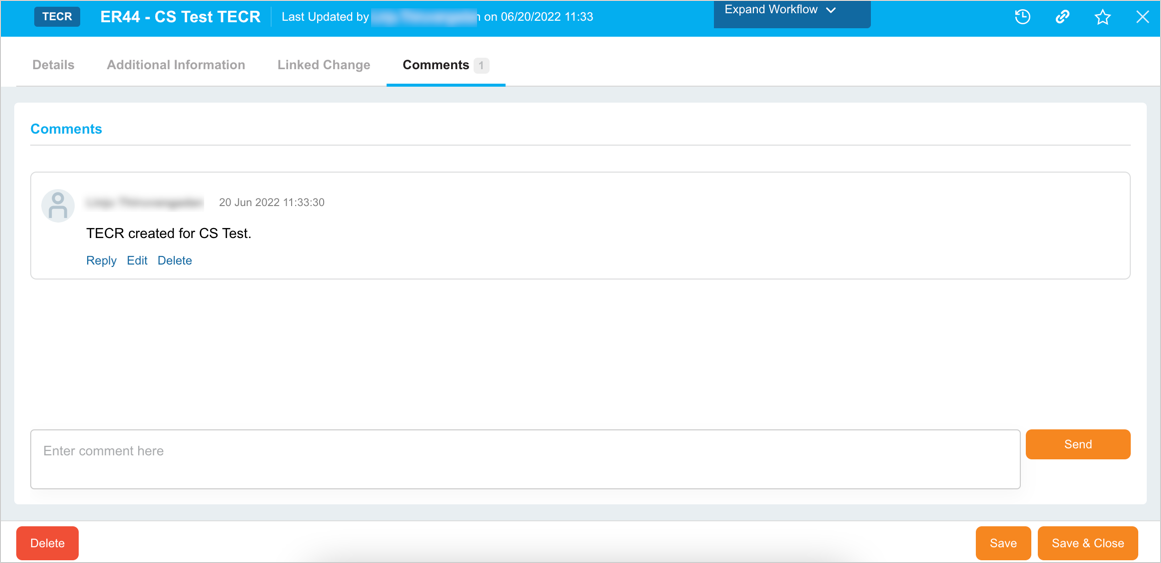
Comments Tab
The Comments tab allows you to add a comment and answer other users’ comments.
- Add a comment: Type your comment into the Enter Comment Here field and click
 .
. - Edit a comment: Click Edit on the comment. Then edit the comment and click
 .
. - Delete a comment: Click Delete on the comment. Then click
 on the confirmation prompt.
 - Reply to a comment: Click Reply and enter your reply comment in the Enter comment here field and click
 .
.
Click .png?revision=1) once you have enter the required details.
once you have enter the required details.
A new TECR is created and will be available on the grid.
Edit a TECR
To edit an existing TECR, search the TECR on the grid. For search and filter options, see Search and Filter Options on this page. Click on the TECR Number or TECR Title to open and edit the TECR. For details, see the above sections.
Export TECRs
To export TECRs from the TECR grid, see Export to XLS.
More Information
TECR Workflow
Workflows allow administrators to control the way TECRs are processed. Using the TECR Status Customization, administrators can set:
- The sequence of TECR Statuses for each TECR Type.
- The User Groups or User Roles that have the permission to update each TECR Status.
For instance, a TECR Type might have a workflow based on the TECR Statuses: Draft > Active > Complete. All User Roles might have permission to change the TECR Status from Draft to Active (using the Status drop-down menu) but only a ‘Manager’ User Role might have permission to change the TECR Status from Active to Complete. This workflow allows managers to check each TECR before it is completed.
If the Enable TECR Workflow checkbox is selected in TECR Status Customization, users can click Expand Workflow  to view the TECR’s workflow path and see who initiated each status update. Clicking Collapse Workflow
  hides the workflow.

TECR Outages
If the TECR contains an outage, this feature enables you to communicate the outage details to the other users on Release & Verify.
Selecting the outage date range displays on TECRs on the Release Calendar.

View Audit History
View ‘Audit History’ of a TECR to access the history of the events and updates associated with this TECR. To view the ‘Audit History’, click  at the top-right corner of the pop-up. For more information, see Audit History.
Copy URL
You can share the URL by clicking  at the top right corner of the TECR pop-up. Then paste the URL into another application or document to be shared. For further information, see Copy URL.
Add to Favourites
You can add a TECR to your Favourites. For this, click on  in the header of the pop-up. For more details, see Favourites.