Add/Edit Changes
Introduction
A Change is a request to deliver new functionality or to make updates to existing functionality, within a Release or Project. A Change lists the technical aspects of a functional change to a System and includes impacts, timings, approvals, and Stakeholders.
Changes can have workflows that allows administrators to control the way Changes are processed.
This article provides an overview of steps to add and edit a Change record in Release & Verify. See Introduction to Change to filter and find Changes in the Change grid.
Pre-requisite
You must have the following user permissions to create/edit a Change record in Release & Verify:
- To add a new: Create Change
- To edit an existing: Update Change
- To lock or unlock a Change: Lock Change
Navigation
Release > Change
Add a Change
To create a Change:
- Navigate to the ‘Change’ page.
- Click
 .
. - The ‘Change’ pop-up displays. Fill in the fields as follows to create a new Change record.
Change Tab
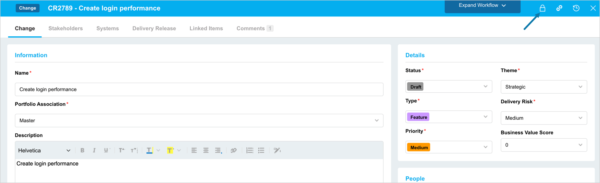
‘Information’ Section
| Fields | Description |
|---|---|
| Name | Mandatory; Enter the Change name. |
| Portfolio Association | Mandatory; Select a Portfolio Association for the Change record. |
| Description | Free text; Enter a description for the Change. |
‘Details’ Section
| Fields | Description |
|---|---|
| Status | Mandatory; Select a Change Status from the drop-down. You can customize the Change Status using the Change Status Customization. |
| Theme | Mandatory; Select a Change theme. You can customize the Change Theme using the Change Theme Customization. |
| Type | Mandatory; Select a Change type. You can customize the Change Type using the Change Type Customization. |
| Delivery Risk | Mandatory; Select the Change Delivery Risk from the drop-down. You can customize the Change Delivery Risk using the Change Delivery Risk Customization. |
| Priority | Mandatory; Select the Change priority. You can customize the Priority using the Change Priority Customization. |
| Business Value Score | Select a business value score from the drop-down. |
| External ID | Records the External ID from which the record was created. Value can only be updated via the APIs. It is non-editable via the UI |
‘People’ Section
| Fields | Description |
|---|---|
| Raised by | By default, this field displays your user name. Select a different user from the drop-down, if needed. |
| Owner | The data in this field is managed by the ‘Stakeholder‘ tab. |
| Assigned to | Select a user or User Group as an assignee to this Change from the drop-down. Adding an assignee enables the users to receive the email notifications related to this Change without being a stakeholder. |
‘Linked Changes’ Section
Linked Changes provide a record of the relationships between other Changes, as well as a shortcut. To link a Change:
- Click
 .
. - Select a relationship from the drop-down. Available relationships are ‘Relates to’, ‘Parent to’ and ‘Child of’. A Linked Change can be related and a parent, or related and a child, but it cannot be a parent AND a child.
- Click the Live Search box and select one or more Changes. Click
 to add the Linked Change.
Remove a Linked Change by clicking X.
If you are adding a Change, you need to save the Change first by clicking .png?revision=1) section is grayed out for a new Change. You must have Update Change user permissions (see Pre-requisites) to add or remove the Linked Changes.
section is grayed out for a new Change. You must have Update Change user permissions (see Pre-requisites) to add or remove the Linked Changes.
‘Date’ section
- Raised on: A system-generated field with the date that the Change was raised.
- Implementation date: This date is taken from the Release under the Delivery Release tab which has the Actual Delivery Release checkbox checked.
- Expected delivery date: Select the expected delivery date.
‘Additional Information’ section
Fill in the fields in this section. This section contains custom fields and tabs, which administrators have added using Change Custom Fields Customization. These fields will vary between each Release & Verify installation. Consult your administrator for the procedure for filling in these fields.
The permission to see a custom field tab is set in Change Custom Fields Customization.
‘Attachments’ section
You can attach, download an existing attachment and delete the URLs and Files to the Change in this section. For details, see Add Attachment.
After making the required entries on the Change tab, click .

Stakeholders Tab
Manage Stakeholders associated with your Change in the Stakeholders tab. For more information, see Manage Change Stakeholders.

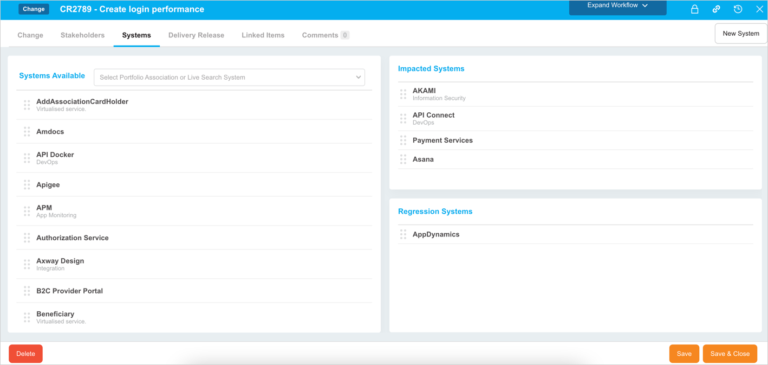
Systems Tab
Add Systems on this tab to indicate the impacted Systems by your Change. For more information, see Manage Change Systems.
Delivery Release Tab
Delivery Release is a view-only tab and it shows the list of Releases that are linked to this Change. For Releases to display on this tab, ensure that you have added the correct Systems in the Systems tab which in turn are associated with the Releases.
Releases must have the following association:
- Release <–> System
AND - System <–> Change
For more details, see Manage Delivery Release.

Linked Items Tab
The Linked Items tab shows the TECRs that have had this Change record added to the Change connected to TECR panel under the Linked Change tab in TECRs. For more details, see Manage Linked Items.

Comments Section
The Comments tab allows you to add a comment and answer other users’ comments.
- Add a comment: Type your comment into the Enter Comment Here field and click
 .
. - Edit a comment: Click Edit on the comment. Then edit the comment and click
 .
. - Delete a comment: Click Delete on the comment. Then click
.png?revision=1) on the confirmation prompt.
on the confirmation prompt. - Reply to a comment: Click Reply and enter your reply comment in the Enter comment here field and click
 .
.

After making all the entries, click .png?revision=1) .
.
More Information
Change Workflow
Workflows allow administrators to control the way Changes are processed. Using the Change Status Customization, administrators can set:
- The sequence of Change Statuses for each Change Type.
- The User Groups or User Roles that have permission to update each Change Status.
For instance, a Change Type might have a workflow based on the Change Statuses: Draft > Active > Complete. All User Roles might have permission to change the Change Status from ‘Draft’ to ‘Active’ (using the Status drop-down menu) but only a ‘Manager’ User Role might have permission to change the Change Status from ‘Active’ to ‘Complete’. This workflow allows managers to check each Change before it is completed.
If the Enable Change Workflow checkbox is selected in Change Status Customization, users can click Expand Workflow  to view the Change’s workflow path.
Clicking Collapse Workflow  hides the workflow.

Lock and Unlock Changes
You can lock or unlock your Change records with the ‘Lock Change’ user permission. If a Change record is locked other users cannot edit or delete it.
This means:
- Administrators can prevent completed records from being edited.
- Users editing the same record cannot save over each other’s edits.
- Bulk update will not save over any record currently being edited.
- Bulk delete will not delete any records currently being edited.
To lock or unlock a Change record, click .png?revision=1) . For more information, see Lock/Unlock Changes.
. For more information, see Lock/Unlock Changes.
Locked records will be grayed out.
View Audit History
Click  to view the Audit History of the record. For more details, see Quick Tips.
Copy URL to Clipboard
To copy a Change’s URL to the clipboard, click  . For details, see Quick Tips.