Add/Edit Environment Groups
Introduction
Environment Groups are a way of organizing your Environments so that:
- Their use case can be shown. For example, UAT Environments might have their own Environment Group.
- Environment maps can show how they communicate with each other
You can add and edit Environment Groups on this page and set what Systems appear on the Continuous Delivery Pipeline page.
Administrators can use Title Names Customization to customize the name of the Environment module where it appears throughout Release & Verify.
Pre-requisite
You must have ‘Create Environments’ and ‘Update Environments’ user permissions.
Navigation
Environment > Groups
Add or Edit an Environment Group
To add an Environment Group:
- Navigate to the ‘Manage Environment Groups’ page.
- Click
 .
. - The ‘Environment Groups’ pop-up displays. Fill in the fields as follows to create a new Environment Group.
Details
Environment Group Detail
| Fields | Description |
|---|---|
| Name | Mandatory; Enter the name of the group. |
| Description | Provide a description of the group. |
| Phase Usage | Select a phase for which the Environment Group is used. You can customize this menu via Used For Phase Customization. |
| Portfolio Association | Select a Portfolio Association. If administrators have selected the My Portfolio Association checkbox for the ‘Restrict Site-Wide View of Environments’ user permission, users outside the selected Portfolio Association will be unable to view or book the Environment Group. |
| Any booking will be automatically approved |
Select this option to make any new or changed Environment Booking automatically approved.
|
| Display booking alert | Booking alerts provide extra information when you try to book the Environment Group. Select the checkbox to make the alert pop-up appear. Then type the Message that will appear in the pop-up. |
Stakeholder
To add a Stakeholder, click .png?revision=1) . ‘Add New Stakeholder’ pop-up displays. Fill in the fields on this pop-up as follows:
. ‘Add New Stakeholder’ pop-up displays. Fill in the fields on this pop-up as follows:
| Fields | Description |
|---|---|
| Name or User Group | Select a user or user group from the drop down as the Stakeholder |
| Role | Select one or more roles for this Stakeholder |
| This field auto-populates the email ID of the Stakeholder if you had selected a user. For the user group, this field is disabled. | |
| Stakeholder RACI | Select one or more Stakeholder roles for this Stakeholder. |
Click .png?revision=1) . The new Stakeholder is added and available on the grid.
. The new Stakeholder is added and available on the grid.
NOTE
If you add the same Stakeholder more than once, on the grid they will appear only once with all their Roles and Stakeholder RACI Roles merged. For example, if a stakeholder with Role A and all the RACI Roles was added again with Role B and no RACI Roles, the Stakeholder would appear only once with Roles A and B and all the RACI Roles.
To remove (or delete) a Stakeholder, click on the Stakeholder on the grid and then click .png?revision=1) . Release & Verify will remove the Stakeholder from the grid and will no longer be Responsible, Accountable, Consulted, or Informed for this Release.
. Release & Verify will remove the Stakeholder from the grid and will no longer be Responsible, Accountable, Consulted, or Informed for this Release.

Additional Information
Click the Additional Information tab and add or edit the information
These Additional Information fields can be added or edited by administrators using the Environment Group Custom Fields Customization and they will vary between each Release & Verify installation. Please consult your administrator for the procedure for filling in these fields.
If a user lacks permission to see a custom field tab’s fields, that tab will be hidden for that user. (The permission is set in Environment Group Custom Fields Customization.)
After making all the entries, click .png?revision=1) .
.
Manage Environments and Group Connectivity
The connections between Environment Groups are mapped in the Environment Map.
Add Environments to the Group
To add Environments and Connectivity to an Environment Group:
- Select an Environment Group.
- The Group Members of this group display at the lower bottom of the page. Click the Group Members tab.
You can click  on the ‘Manage Environment Groups’ header to minimize the section. This gives you better visibility of the Manage Connectivity section.
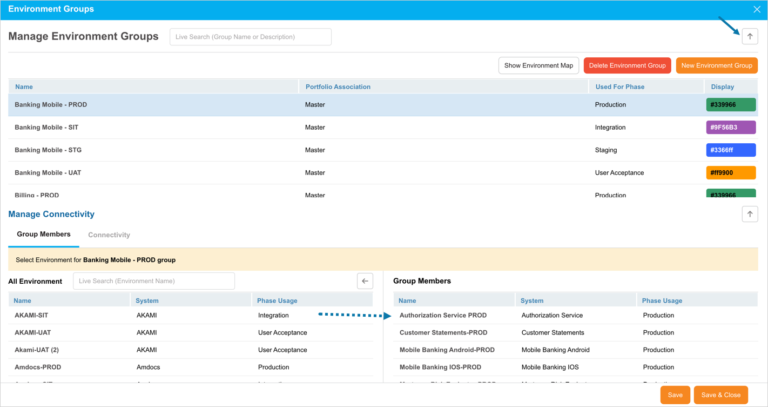
- Drag and drop Environments into the Group Members panel. You can use ‘Live Search’ to search the Environments.
- Click
.png?revision=1) .
.
Manage Connectivity
Click the Connectivity tab to add connections. Connections with the same Type cannot be duplicated. If you click Save or Batch Add and one or more of your connections already exist between the same Environments with the same Type, you will be prompted to edit your Connections.
Add a single connection:
- Click
 . A new row appears.
 - Select a Source Environment in the new row (the Source menu is populated from the list selected in the Group Members tab).
- Select a Direction.
- Select a Target Environment (Target menu is populated from the list selected in the Group Members tab).
- Select a Type. Selecting the Type will also select the connection color displayed in Environment Map for single connections.
- Click .
You can customize the Type and the single connection color in Connectivity Type.

Batch Add Connections:
Create multiple connections from one Environment to multiple other Environments in one click.
- Select a Source Environment ‘Batch Add’ row (Source menu is populated from the list selected in the Group Members tab).
- Select a Direction.
- Select Target Environments by clicking to open the menu and selecting checkboxes (the Target menu is populated from the list selected in the Group Members tab).
- Select a Type.
- Click
 .
.

Move a Connection
Move one or more Connections and their Environments to another Environment Group.
- Click to select the checkboxes of the Connections you want to move.
- Click
 .
. - Select the new Environment Group from Move to.
- Click .
Delete a Connection
- Click to select a Connection.
- Click Delete Connection.
Edit the Environment Group Color
Once you have created an Environment Group, you can edit its display color. The display color appears in the Environment Schedule.
The default color of Environment Groups after their creation is purple (#9f56B3).
To edit an Environment Group’s Display color:
- Locate the Environment Group in the Manage Environment Groups panel at the top of the page. Use Live Search if necessary.
- Double click the Environment Group’s Display column and select a color or type a Hex value and press Enter.

Edit Environment Group
To edit an existing Environment Group, search the Environment Group and click on the Name to open and edit. For details, see the above sections.
More Information
Show Environment Map
Click the Show Environment Map button to open the selected Environment Group in Environment Map.
View Audit History
View Audit History of a record to access the associated history of the events and updates. To view the ‘Audit History’, click .png?revision=1) at the top-right corner of the pop-up. For more information, see Audit History.
at the top-right corner of the pop-up. For more information, see Audit History.
Copy URL
You can share the Group’s URL by clicking .png?revision=1) at the top right corner of the pop-up. Then paste the URL into another application or document to be shared. For further information, see Copy URL.
at the top right corner of the pop-up. Then paste the URL into another application or document to be shared. For further information, see Copy URL.