Email Template Wizard Customization
Introduction
The Email Template Wizard allows administrators to set up the email templates in Release & Verify. Email templates send emails which:
- are sent after certain trigger events, such as an updated release date. Triggered emails are sent one minute after your update for all Entities. If you make multiple updates, with each update being less than a minute after the previous update, those updates will appear in a single email one minute after the final update. This prevents large numbers of email notifications from being created.
- contain specified content.
- are sent to specified users or user groups.
- are sent to users’ notification emails. See Update Profile.
- are sent through Mailgun, which uses opportunistic TLS.
Whenever Mailgun connects to an MX server, it tries to deliver messages over a secure TLS connection. However, if the server doesn’t offer TLS or an error occurs, such as an invalid certificate while establishing the connection, Mailgun will still deliver the message but over an insecure plaintext SMTP connection.
For Release & Verify email templates customization page, see Release & VerifyEmail Templates Customization.
Pre-requisite
You must have ‘Site Administration’ user permission to be able to access and add/edit an email template.
Navigation
Settings  > Customization > Email Notifications > Email Template Wizard
Add an Email Template
To add an Email Template:
- Navigate to the ‘Email Template Wizard’ page.
- Click
 .
. - The ‘Email Template Wizard’ pop-up displays.

- Fill in the template as follows:
| Step | Fields/Description |
|---|---|
| Email details | Email Template Name: Mandatory; Enter a unique name for this template. Description: Free text; Enter a description for the template. Status: Select the status from the drop-down. |
| Entity and triggers | Entity: Select an entity from the drop-down. Trigger: Your choice of Entity will alter what Triggers are available. Select Trigger from the drop-down menu. Certain Triggers display ‘Trigger Options’ on selection. If ‘Trigger Options’ appear’, select as per the requirement. See the list of Entities and their Triggers below. |
| Email template | Email Subject Line: Enter the email subject From: Displays the default from address, change if required. Alias: Enter the name of the person or company. Mail Body: Type the mail body. Drag Entity fields on the left-hand side into the Mail Body to automatically generate information in the email, such as the Release Name. See the list of Entity fields below. On a Windows computer, one left-click allows the Entity field to be selected and dragged. On a Mac, the first left-click selects the Entity field and the second left-click allows you to drag. |
| Preview | View only; displays a preview of the email. Click < to make changes. |
| Email recipients | Choose the recipients of your email. You can select respective recipient checkboxes or select the specific recipients in the Specified recipients drop-down menu. |
- Click
 if you wish to send a test email.
 - Click
 .
.
The new email template is created and it displays on the grid.
Edit an Email Template
To edit an existing email template, search the email template on the ‘Email Template Wizard’ page. Click  .
.
The template opens, make changes as required and click .png?revision=1) . For detail on the fields, refer to the above table.
. For detail on the fields, refer to the above table.
Duplicate an Email Template
To duplicate an email template:
- Search and select the email template that you want to duplicate.
- Click
 .
. - ‘Duplicate current email template’ pop-up displays. Enter the new Email Template Name.
- Click

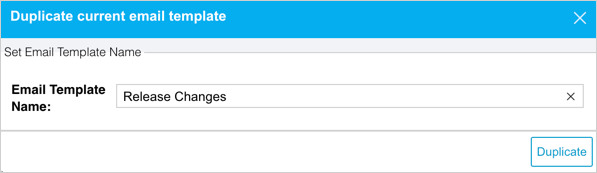
The email template is created and it displays on the grid.
Delete an Email Template
To delete an email template:
- Search and select the email template that you want to delete.
- Click
 .
. - Click
 on the confirmation pop-up.

The email template is now deleted and a confirmation message displays.
Sort Email Templates
Sort Manually
Sorting ‘Email Templates’ manually changes their order in the drop-down menus
To sort manually:
- On the ‘Email Template Wizard’ page hover your mouse cursor over the sort column of the template that you want to sort.
 appears.
 - Drag and drop the email template as you require.
- Click
 .
.
Sort by Column Header
Sorting by column header only changes their order on the ‘Email Template wizard’ page.
To sort alphabetically by column header, click on the column header. ↑ or ↓ displays indicating the ascending or descending column sort.
List of Entities and Their Triggers
- Grid setup allows administrators to build the structure of the email body using fields that only relate to that particular trigger.
- For example, the grid setup that appears for the entity TEBR and trigger Assignee Updated contains fields from Release Phases and Environments, which allow fields from Releases linked to TEBRs and booked Environments to be added to the email body.
- The Triggers available depend on the Entity chosen while creating the Email Template.
- Comments emails (see New comments added triggers below) can be turned off using Comments Customization.
The following lists show the Triggers associated with each Entity:
Release
- Created:
- Trigger options:
- Enable Conditional Triggering:
TIP
Conditional Triggering allows a user to more precisely select what will trigger the email. For example, specify a Release’s Name to see emails only regarding that Release.
- Click to toggle Enable Conditional Triggering and select the data Column, and triggering Condition. and type the Value.
- Click to toggle Enable Conditional Triggering and select the data Column, and triggering Condition. and type the Value.
- Send email when Release has been created.
- Enable Conditional Triggering:
- Trigger options:
- Status updated:
- Trigger options:
- Enable Conditional Triggering:
- Click to toggle Enable Conditional Triggering and select the data Column, and triggering Condition. and type the Value.
- Send email when Release status has been changed.
- Enable Conditional Triggering:
- Trigger options:
- Any value updated:
- Trigger options:
- Enable Conditional Triggering:
- Click to toggle Enable Conditional Triggering and select the data Column, and triggering Condition. and type the Value.
- Enable Conditional Triggering:
- Trigger options:
- Systems updated:
- Trigger options:
- Enable Conditional Triggering:
- Click to toggle Enable Conditional Triggering and select the data Column, and triggering Condition. and type the Value.
- Enable Conditional Triggering:
- Trigger options:
- New comments added:
- Trigger options:
- Enable Conditional Triggering:
- Click to toggle Enable Conditional Triggering and select the data Column, and triggering Condition. and type the Value.
- Enable Conditional Triggering:
- Trigger options:
- Implementation date updated:
- Trigger options:
- Enable Conditional Triggering:
- Click to toggle Enable Conditional Triggering and select the data Column, and triggering Condition. and type the Value.
- Enable Conditional Triggering:
- Trigger options:
Release Activities
- Assignee updated.
- Status updated.
- Any value updated.
- Trigger options:
- Enable Conditional Triggering:
TIP
Conditional Triggering allows a user to more precisely select what will trigger the email. For example, specify an Activity’s Name to see emails only regarding that Activity.
- Click to toggle Enable Conditional Triggering and select the data Column, and triggering Condition. and type the Value.

- Click to toggle Enable Conditional Triggering and select the data Column, and triggering Condition. and type the Value.
- Enable Conditional Triggering:
- New comments added.
- Due date approaching:
- Trigger options:
- Email notification is sent X days before Activity or Criteria is due.
- Send out a reminder email notification each day post due date if the status is not complete.
- Send email notification only when existing activity dependencies have been satisfied
- Enable status updating via Secure Email Link without logging into Release & Verify.
Note: Email Notifications do not include Activities or Criteria that are set to N/A.
- Trigger options:
- Regular sending:
- Trigger options:
- Perform regular message sending at the selected time each day.
- Report grid setup:
- Drag and drop Release parameters into the Release Parameters field. Selected Phase parameters will be displayed in the email if is used in the email body.
- Trigger options:
- Dependencies resolved.

TECRs
- Assignee updated:
- Trigger options:
TIP
Conditional Triggering allows a user to more precisely select what will trigger the email. For example, specify a TECR’s ID to see emails only regarding that TECR.
- Enable Conditional Triggering:
- Click to toggle Enable Conditional Triggering and select the data Column, and triggering Condition. and type the Value.
- Enable status updating via Secure Email Link without logging into Release & Verify.
- Enable Conditional Triggering:
- Trigger options:
- Created:
- Trigger options:
- Enable Conditional Triggering:
- Click to toggle Enable Conditional Triggering and select the data Column, and triggering Condition. and type the Value.
- Send email when TECR status has been changed to. (Toggle switch to On to make changes.)
- Send email when TECR type is. (Toggle switch to On to make changes.)
- Enable status updating via Secure Email Link without logging into Release & Verify.
- Enable Conditional Triggering:
- Trigger options:
- Status updated:
- Trigger options:
- Enable Conditional Triggering:
- Click to toggle Enable Conditional Triggering and select the data Column, and triggering Condition. and type the Value.
- Send email when TECR status has been changed to. (Toggle switch to On to make changes.)
- Send email when TECR type is. (Toggle switch to On to make changes.)
- Enable status updating via Secure Email Link without logging into Release & Verify.
- Enable Conditional Triggering:
- Trigger options:
- Any value updated:
- Trigger options:
- Enable Conditional Triggering:
- Click to toggle Enable Conditional Triggering and select the data Column, and triggering Condition. and type the Value.
- Enable status updating via Secure Email Link without logging into Release & Verify.
- Enable Conditional Triggering:
- Trigger options:
- New comments added:
- Trigger options:
- Enable Conditional Triggering:
- Click to toggle Enable Conditional Triggering and select the data Column, and triggering Condition. and type the Value.
- Enable status updating via Secure Email Link without logging into Release & Verify.
- Enable Conditional Triggering:
- Trigger options:
- Date approaching:
- Trigger options:
- Enable Conditional Triggering:
- Click to toggle Enable Conditional Triggering and select the data Column, and triggering Condition. and type the Value.
- Email notification is sent X days before Change request starts.
- Email notification is sent X days before Change request ends.
- Enable status updating via Secure Email Link without logging into Release & Verify.
- Enable Conditional Triggering:
- Trigger options:
- Conflict: When a TECR has been raised with dates that conflict with your existing Environment Bookings (whether booked from a TEBR or a Release).
- Trigger options:
- Enable Conditional Triggering:
- Click to toggle Enable Conditional Triggering and select the data Column, and triggering Condition. and type the Value.
- Enable status updating via Secure Email Link without logging into Release & Verify.
- Enable Conditional Triggering:
- Trigger options:
- Environment Status updated.
- Trigger options:
- Enable Conditional Triggering:
- Click to toggle Enable Conditional Triggering and select the data Column, and triggering Condition. and type the Value.
- Enable Conditional Triggering:
- Trigger options:
- Environment Build Status updated.
- Trigger options:
- Enable Conditional Triggering:
- Click to toggle Enable Conditional Triggering and select the data Column, and triggering Condition. and type the Value.
- Enable Conditional Triggering:
- Trigger options:
- Dates updated.
- Trigger options:
- Enable Conditional Triggering:
- Click to toggle Enable Conditional Triggering and select the data Column, and triggering Condition. and type the Value.
- Enable status updating via Secure Email Link without logging into Release & Verify.
- Enable Conditional Triggering:
- Trigger options:
TEBRs
-
Assignee updated:
-
Trigger options:
TIP
Conditional Triggering allows a user to more precisely select what will trigger the email. For example, specify a TEBR’s name to see updates only for that TEBR.
-
Enable Conditional Triggering:
-
Click to toggle Enable Conditional Triggering and select the data Column, and triggering Condition. and type the Value.
-
-
Environment grid setup:
-
Click the Phase tab and drag and drop Phase parameters into the Phase field. Selected Phase parameters will be displayed in the email if is used in the email body.
-
Click the Environment tab and drag and drop Environment parameters into the Environment field. Selected Environment parameters will be displayed in the email if is used in the email body.
-
-
-
-
Status changed:
-
Trigger options:
-
Enable Conditional Triggering:
-
Click to toggle Enable Conditional Triggering and select the data Column, and triggering Condition. and type the Value.
-
-
Send email when TEBR status has been changed to. (Toggle switch to On to make changes.)
-
Environment grid setup.
-
-
-
Created:
- Trigger options:
- Trigger automated emails for TEBRs submitted without sufficient lead time.
TIP
Lead time is the minimum number of days required for actioning a TEBR.
- Click to toggle Trigger automated emails for TEBRs submitted without sufficient lead time and select the Lead Time days.
- Click to select the Automatically adjust for Weekend checkbox to automatically extend the lead time by two days if the lead time goes over the weekend.
- Enable Conditional Triggering:
- Click to toggle Enable Conditional Triggering and select the data Column, and triggering Condition. and type the Value.
- Click to select the Enable status updating via Secure Email Link without logging into Release & Verify checkbox to allow users to be able to update the TEBR status by clicking the email without having to be logged into Release & Verify.
- Environment grid setup.
- Trigger automated emails for TEBRs submitted without sufficient lead time.
- Trigger options:
- Any value updated:
- Trigger options:
- Enable Conditional Triggering:
- Click to toggle Enable Conditional Triggering and select the data Column, and triggering Condition. and type the Value.
- Environment grid setup.
- Enable Conditional Triggering:
- Trigger options:
- Deleted:
- Trigger options:
- Enable Conditional Triggering:
- Click to toggle Enable Conditional Triggering and select the data Column, and triggering Condition. and type the Value.
- Environment grid setup.
- Enable Conditional Triggering:
- Trigger options:
- Expired:
- Trigger options:
- Enable Conditional Triggering:
- Click to toggle Enable Conditional Triggering and select the data Column, and triggering Condition. and type the Value.
- Email notification is sent X days before Booking request starts.
- Environment grid setup.
- Enable Conditional Triggering:
- Trigger options:
- Date approaching:
- Trigger options:
- Enable Conditional Triggering:
- Click to toggle Enable Conditional Triggering and select the data Column, and triggering Condition. and type the Value.
- Email notification is sent X days before Booking request starts.
- Email notification is sent X days before Booking request ends.
- Enable status updating via Secure Email without logging into Release & Verify.
- Environment grid setup.
- Enable Conditional Triggering:
- Trigger options:
- Conflict: When a TEBR or Release booking for an Environment or Environment Group comes into conflict with a TEBR, conflict emails will be sent for all affected TEBRs:
- Trigger options:
- Enable Conditional Triggering:
- Click to toggle Enable Conditional Triggering and select the data Column, and triggering Condition. and type the Value.
- Environment grid setup.
- Enable Conditional Triggering:
- Trigger options:
- New comments added:
- Trigger options:
- Enable Conditional Triggering:
- Click to toggle Enable Conditional Triggering and select the data Column, and triggering Condition. and type the Value.
- Environment grid setup.
- Enable Conditional Triggering:
- Trigger options:
- Dates updated.
- Trigger options:
- Enable Conditional Triggering:
- Click to toggle Enable Conditional Triggering and select the data Column, and triggering Condition. and type the Value.
- Enable status updating via Secure Email Link without logging into Release & Verify.
- Enable Conditional Triggering:
- Trigger options:
Changes
As well as Stakeholders, Users or User Groups selected in the Assigned To field are now sent notifications.
- Status updated.
- Any value updated.
- Lock status updated (when Change gets locked or unlocked)
- New comments added.
Deployment Plan
- Status updated: Notifies users if a Deployment Plan’s mode has been updated from Draft, Approved, Execution, or Completed.
- Trigger options:
- Enable Conditional Triggering:
- Click to toggle Enable Conditional Triggering and select the data Column, and triggering Condition. and type the Value.
- Enable Conditional Triggering:
- Trigger options:
Deployment Plan Activity
- Activity hasn’t ended on time.
- Trigger options:
- Enable Conditional Triggering:
- Click to toggle Enable Conditional Triggering and select the data Column, and triggering Condition. and type the Value.
- Send email notification only when existing activity dependencies have been satisfied
- Enable status updating via Secure Email Link without logging into Release & Verify.
- Enable Conditional Triggering:
- Trigger options:
- Activity hasn’t started on time.
- Trigger options:
- Enable Conditional Triggering:
- Click to toggle Enable Conditional Triggering and select the data Column, and triggering Condition. and type the Value.
- Send email notification only when existing activity dependencies have been satisfied
- Enable status updating via Secure Email Link without logging into Release & Verify.
- Enable Conditional Triggering:
- Trigger options:
- Activity is about to start.
- Trigger options:
- Enable Conditional Triggering:
- Click to toggle Enable Conditional Triggering and select the data Column, and triggering Condition. and type the Value.
- Send email notification only when existing activity dependencies have been satisfied
- Enable status updating via Secure Email Link without logging into Release & Verify.
- Enable Conditional Triggering:
- Trigger options:
- Activity is completed.
- Trigger options:
- Enable Conditional Triggering:
- Click to toggle Enable Conditional Triggering and select the data Column, and triggering Condition. and type the Value.
- Enable Conditional Triggering:
- Trigger options:
- Activity status updated.
- Trigger options:
- Enable Conditional Triggering:
- Click to toggle Enable Conditional Triggering and select the data Column, and triggering Condition. and type the Value.
- Enable Conditional Triggering:
- Trigger options:
- Ad-hoc alert button is pressed.
- Trigger options:
- Enable Conditional Triggering:
- Click to toggle Enable Conditional Triggering and select the data Column, and triggering Condition. and type the Value.
- Enable status updating via Secure Email Link without logging into Release & Verify.
- Enable Conditional Triggering:
- Trigger options:
- Any value updated.
- Trigger options:
- Enable Conditional Triggering:
- Click to toggle Enable Conditional Triggering and select the data Column, and triggering Condition. and type the Value.
- Approved Mode toggle switch: Send notifications when the Deployment Plan is in Approved Mode.
- Execution Mode toggle switch: Send notifications when the Deployment Plan is in Execution Mode.
TIP
E
- If neither toggle switch is selected, notifications will be sent in Draft, Approved, Execution, and Completed modes.
- Enable Conditional Triggering:
- Trigger options:
- Enable Conditional Triggering:
- Click to toggle Enable Conditional Triggering and select the data Column, and triggering Condition. and type the Value.
- Enable status updating via Secure Email Link without logging into Release & Verify.
- Enable Conditional Triggering:
- Trigger options:
- Broadcast remaining duration.
- Trigger options:
- Enable Conditional Triggering:
- Click to toggle Enable Conditional Triggering and select the data Column, and triggering Condition. and type the Value.
- Enable status updating via Secure Email Link without logging into Release & Verify.
- Enable Conditional Triggering:
- Trigger options:
- New comment added.
- Trigger options:
- Enable Conditional Triggering:
- Click to toggle Enable Conditional Triggering and select the data Column, and triggering Condition. and type the Value.
- Enable Conditional Triggering:
- Trigger options:
- Planned dates modified.
- Trigger options:
- Enable Conditional Triggering:
- Click to toggle Enable Conditional Triggering and select the data Column, and triggering Condition. and type the Value.
- Approved Mode toggle switch: Send notifications when the Deployment Plan is in Approved Mode.
- Execution Mode toggle switch: Send notifications when the Deployment Plan is in Execution Mode.
TIP
If neither toggle switch is selected, notifications will be sent in Draft, Approved, Execution, and Completed modes.
- Enable Conditional Triggering:
- Trigger options:
PIR Item
- Created.
- Status updated.
- Any value updated.
- New comments added.
- PM/RC/Action status updated.
- Assignee updated.
Phase/Gate
- Dates changed.
Environment Bookings
- Created.
- Status updated:
- Trigger option:
- Send email when status has been changed to:
- Click the toggle switch until it is blue and On, then select from the Items Selected menu.
- Send email when status has been changed to:
- Trigger option:
- Dates updated.
- Deleted.
ETL Notification
These Triggers are customized for each customer.
PIR
- Created.
- Status updated:
- Trigger option:
- Send email when PIR status has been changed to:
- Click the toggle switch until it is blue and On, then select from the Items Selected menu.
- Send email when PIR status has been changed to:
- Trigger option:
- Any value updated.
PIR Preventative Measures and Action
- Created.
- Any value updated.
- Status updated.
- Assignee Updated.
- Due Date approaching.
- Trigger options:
- Send email when a Preventative measure or Action status is.
- Email notification is sent X days before preventative measure or action is due.
- Send out reminder email notification each day post due date if status is selected.
- Trigger options:
- New comments added.
PIR Item Root Cause Analysis
- Created.
- Any value updated.
- Status updated.
- New comments added.
Environments
- Health Check Status updated.
- Trigger options: Send email when status has been changed to.
- Status updated.
Click the toggle switch until it is blue and On, then select from the Items Selected menu.
IM Forms
- Created.
- Status updated:
- Trigger option:
- Relationship to instance:
- Child.
- Parent.
- Self.
- Form Workflow to check:
- If there are any Workflows, they will be listed.
- Workflow status to trigger:
- If there are any Workflow statuses, they will be listed.
- Relationship to instance:
- Trigger option:
- Any value updated:
- Trigger option:
- Fields to watch:
- Form fields will be listed here.
- Fields to watch:
- Trigger option:
- Due date approaching.
- Trigger options:
- Email notification is sent X days before Activity or Criteria is due.
- Send out reminder email notification each day post due date if the status is not complete.
- Form Date field to monitor:
- Form Date fields will be listed here.
- Trigger options:
- New comment added.
List of Entity Fields
When adding or editing an Email Template, drag entity fields into the Mail Body field to automatically insert information. The Entity Fields available depend on the Entity chosen while creating the Email Template.
TIP
Comments emails (see fields below) can be turned off using Comments Customization.
TIP
Enable the “Show Previous Old Values Inline” feature to view the data that existed prior to the change being made and the email notification being triggered
The following lists show the Entity Fields associated with each Entity:
Release
- .
- .
- .
- .
- .
- .
- .
- .
- .
- .
- .
- .
- – Now only contains the Release ID.
- .
- – If the user has any additional information fields they will be listed here.
- .
- .
- .
- .
- .
Release Activities
- .
- .
- .
- .
- .
- .
- .
- .
- .
- .
- .
- .
- .
- .
- .
- .
- .
- .
- .
- .
- .
- .
- .
- .
- – Now only contains the Activity/Criteria ID.
- – Now only contains the Release ID.
- .
- .
- – If the user has any additional information fields they will be listed here.
- .
- .
- .
TECRs
- .
- .
- .
- .
- .
- .
- .
- .
- .
- .
- .
- .
- .
- .
- .
- .
- .
- .
- – Now only contains the TECR Number.
- – If the user has any additional information fields they will be listed here.
- .
- .
- .
TEBRs
- .
- .
- .
- .
- .
- .
- .
- .
- .
- .
- .
- .
- .
- .
- .
- .
- – This Entity Field inserts the Environment Grid setup, that was created in the Entity and Triggers tab.
- – Now only contains the TEBR ID.
- – If the user has any additional information fields they will be listed here.
- .
- .
- .
Changes
As well as Stakeholders, Users or User Groups selected in the Assigned To field are now sent notifications.
- .
- .
- .
- .
- .
- .
- .
- .
- .
- .
- .
- .
- – Now only contains the Changes ID.
- .
- – If the user has any additional information fields they will be listed here.
- .
- .
- .
Deployment Plan
- .
- .
- .
- .
- .
- .
- .
- .
- .
- .
- .
- .
- – Deployment Plan Activity Custom Fields will be listed here.
- .
- .
Deployment Plan Activity
- .
- .
- .
- .
- .
- .
- .
- – Either Manual or Automated.
- .
- .
- .
- .
- .
- .
- .
- .
- .
- .
- .
- .
- .
- .
- – Deployment Plan Custom Fields will be listed here.
- – Deployment Plan Activity Custom Fields will be listed here.
- .
- .
- .
PIR Item
- .
- .
- .
- .
- .
- .
- .
- .
- .
- .
- .
- .
- .
- – Now only contains the PIR ID.
- – Now only contains the PIR Item ID.
- .
- .
- .
- .
- .
- .
Phase/Gate
- .
- .
- .
- .
- .
- .
- .
- .
- .
- – Now only contains the Release ID.
- .
- .
- .
Environment Bookings
- .
- .
- .
- .
- .
- .
- .
- .
- .
- .
- .
- .
- .
- .
- .
- .
- .
- .
- .
ETL Notification
- .
- .
- .
- .
- .
- .
- .
- .
PIR
- .
- .
- .
- .
- .
- .
- .
- .
- .
- – Now only contains the PIR ID.
- – If the user has any additional information fields they will be listed here.
- .
- .
- .
PIR Preventative Measures and Actions
- .
- .
- .
- .
- .
- .
- .
- .
- .
- .
- .
- .
- .
- .
- .
- .
- .
- .
- .
- .
- – Now only contains the PIR ID.
- – Now only contains the PIR Item ID.
- .
- .
- .
- .
- .
PIR Item Root Cause Analysis
- .
- .
- .
- .
- .
- .
- .
- .
- .
- .
- .
- .
- .
- – Now only contains the PIR ID.
- – Now only contains the PIR Item ID.
- .
- .
- .
- .
- .
Environments
- .
If you select TEBR, TECR, or Release field in the email template, the following conditions must be met to receive its data:
- TEBRs, TECRs, and Releases are not in Completed or Cancelled mode.
- The Environment Health Check Status update must take place within the environment booking dates (start and end dates) or within TECR dates (start and end dates).
IM Forms
- .
- .
- .
List of Entities and their Email Recipients
Email recipients checkboxes depend on the Entity chosen while creating the Email Template.
The following lists show the Email Recipient checkboxes associated with each Entity.
Release
Created
- Enterprise Release stakeholders.
- Release Owner
- Specified recipients.
Status Updated
- Responsible stakeholders.
- Updater.
- Release stakeholders.
- Enterprise Release stakeholders.
- Release Owner.
- Specified recipients.
Any Value Updated
- Responsible stakeholders.
- Updater.
- Release stakeholders.
- Enterprise Release stakeholders.
- Release Owner.
- Specified recipients.
Systems Updated
- Responsible stakeholders.
- Updater.
- Release stakeholders.
- Enterprise Release stakeholders.
- Release Owner.
- Specified recipients.
New Comments Added
- Responsible stakeholders.
- Updater.
- Release stakeholders.
- Enterprise Release stakeholders.
- Release Owner.
- Specified recipients.
Implementation Date Updated
- Responsible stakeholders.
- Updater.
- Release stakeholders.
- Enterprise Release stakeholders.
- Release Owner.
- Specified recipients.
Release Activities
All Triggers except for Regular Sending
- Assigned to.
- Responsible stakeholders.
- Updater.
- Release stakeholders.
- Enterprise Release stakeholders.
- Release Owner.
- Specified recipients.
Regular Sending
- Assigned to.
- Responsible stakeholders.
- Release Owner.
TECRs
All Triggers except Conflict
- Assigned To.
- Requestor.
- Environment stakeholders: Now sends to all User Group Stakeholders too.
- Release stakeholders: Now sends to all User Group Stakeholders too.
- Enterprise Release stakeholders.
Conflict
Send email to:
TECR Entity
- Assigned To.
- Requestor.
- Release Stakeholders.
Environment Entities
- Environment/Environment Group Stakeholders.
Release Entity
- Release Stakeholders.
TEBR Entity
- Assigned To.
- Requestor.
TEBRs
- Assigned To.
- Requestor.
- Watchers.
- Environment stakeholders: Now sends to all User Group Stakeholders too.
- Release stakeholders: Now sends to all User Group Stakeholders too.
- Enterprise Release stakeholders.
Change
Status updated and Any value updated
- Assigned To.
- Responsible stakeholders.
- Requestor.
- Change stakeholders: Now sends to all User Group Stakeholders too.
- Target Release stakeholders: Now sends to all User Group Stakeholders too.
- Enterprise Release stakeholders.
Lock status updated and New comments added
- Assigned To.
- Responsible stakeholders.
- Requestor.
- Change stakeholders: Now sends to all User Group Stakeholders too.
- Target Release stakeholders: Now sends to all User Group Stakeholders too.
- Enterprise Release stakeholders.
- Specified recipients.
Deployment Plan
- Responsible stakeholders.
- Deployment Plan stakeholders.
- Specified recipients.
Deployment Plan Activity
Activity status is updated, Ad-hoc button is pressed, Broadcast actual/planned duration, Broadcast remaining duration
- Responsible (Activity assignee).
- Deployment Plan stakeholders.
- Notify the Assignee of the next Activity.
- Notify Assignees of all subsequent Activities.
- Send to specified recipients.
Activity hasn’t started on time, Activity is about to start, Activity is completed
- Send email to Responsible (Activity assignee).
- Send to all Deployment Plan stakeholders.
- Notify the Assignee of the next Activity.
- Notify Assignees of all subsequent Activities.
- Send to specified recipients.
Any value updated, New comments added, Planned dates modified
- Send email to Responsible (Activity assignee).
- Send email to Updater.
- Send to all Deployment Plan stakeholders.
- Notify the Assignee of the next Activity.
- Notify Assignees of all subsequent Activities.
- Send to specified recipients.
PIR Item
- PIR Item Assigned To.
- PIR Item Raised By.
- PM/Action Assignee.
- Specified recipients.
Phase/Gate
- Release Responsible stakeholder.
- Release stakeholders.
- Enterprise Release stakeholders.
- Release Owner.
- Specified recipients.
Environment Bookings
- Environment stakeholders.
- Release stakeholders: Now sends to all User Group Stakeholders too.
- Enterprise Release stakeholders.
- Specified recipients.
ETL Notification
- Specified recipients.
PIR
- PIR Raised By.
- Specified recipients.
PIR Preventative Measures and Action
- Assignee.
- M/Action Raised By.
- Specified recipients.
PIR Item Root Cause Analysis
- PM/Action Raised By.
- Specified recipients.
Environments – Health Check Status updated
- Environment Responsible stakeholders.
- Environment stakeholders.
- System stakeholders.
- TEBR Creator.
- TECR Creator.
- Release Owner.
- Specified recipients.
Environments – Status updated
- Environment Responsible stakeholders.
- Updater.
- Environment stakeholders.
- System stakeholders.
- Specified recipients.
IM Forms
- Specified recipients from field.
- Specified recipients
More Information
Comment notification emails can be generated in two ways: by toggling on Comments Customization, or by making an Email Template