API – Integration Hub Customization
API – Integration Hub Customization supports API-to-API and file-to-API integration using NodeJS scripts.
Administrators can establish customized integration layers between their existing systems like Jira, Clarity, TFS, TeamCity, CircleCI, Octopus Deploy, XL Deploy, CloudBees Flow, and many others.
There are two basic ways that Integration Hub works:
- Data synchronization using a schedule: Uploading and scheduling scripts containing business rules for mapping fields and entity relationships.
- Triggering events: Running scripts as Automated Jobs in Builds, TECRs, and Deployment Plan Activities.
Developers should read Use Cases And Sample Scripts For API – Integration Hub Customization.

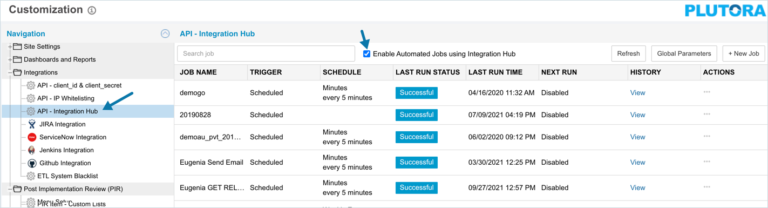
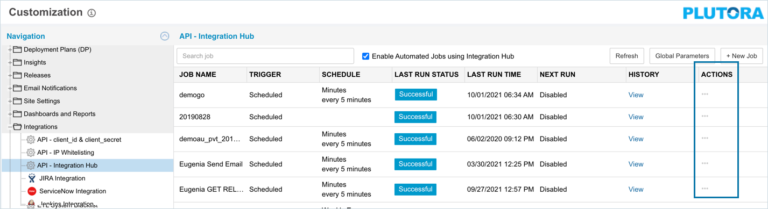
Integration Hub Grid View
The API – Integration Hub Customization grid displays the list of jobs, including the Job Name, Schedule, the last time it was run, and when it is due to run next.
The grid should refresh every minute. Click the Refresh button (circled in the screenshot below) to make it refresh immediately.

Next Run messages mean:

- A future time, such as In a few seconds: The scheduled job is about to run.
- Running: Script is currently running.
- Overdue: The scheduled run time has passed but something is blocking the script from running.
- Disabled:
- Scheduled Jobs: The Enabled toggle switch is off.
- Automated Jobs: Automated Job is selected.
Enable Automated Jobs using Integration Hub
Enabling automated jobs using Integration Hub allows users to select Integration Hub jobs when adding automated jobs to their System. See Orchestration Using Automated Jobs.
Manage API – Integration Hub Customization:
- Go to Settings
 > Customization > Integrations.
 - Click API – Integration Hub.
- Click to select the Enable Automated Jobs using Integration Hub checkbox.
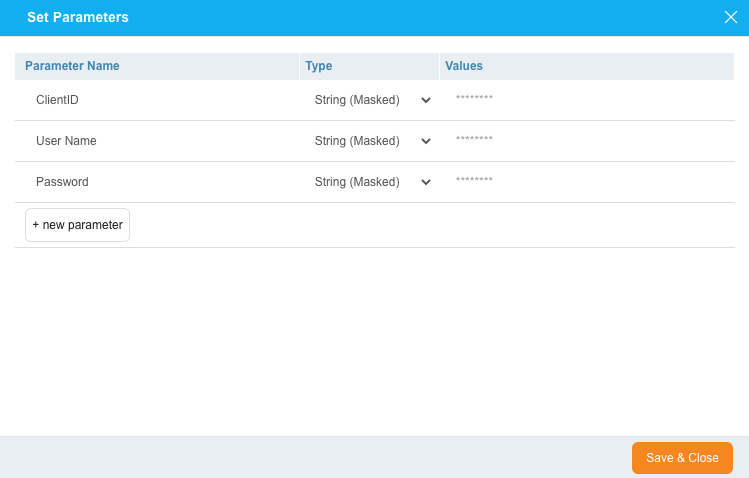
Manage Global Parameters
Global Parameters can be referenced by every script in Integration Hub. They are a good way of adding authentication credentials or other information that needs to be secure.
See Using Parameters below for how to reference parameters in a script.
To manage Global Parameters:
- Click Global Parameters.

- Add or edit a parameter:

- Add: Click + new parameter.
Edit: Click any field on an existing parameter. - Type the Parameter Name.
- Click to select the Type of string:
- String: Shows the Value field.
- String (Masked): Masks the Value field with a dot for each character. Similar to a password field.
TIP
Once String (Masked) has been selected and saved on a parameter, the value will never be displayed again. A masked parameter cannot be reverted to an unmasked parameter.
- Type the Values. This could be a password or clientID.
- Add: Click + new parameter.
- Delete a parameter:
- Hover your mouse cursor over the parameter.
- Click the red X.
- Click Save & Close.
Add or Edit Integration Hub Jobs
- Add or edit a script:
- Add: Click + New Job.
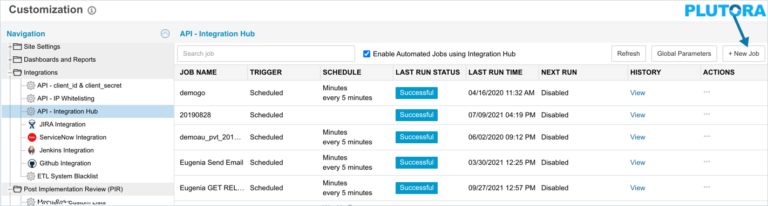
Edit: Click a script’s Job Name in the grid. - Type Job Name. (Mandatory field.)

- Type a Description.
- Manage Parameters:
TIP
See Using Parameters below for how to reference parameters in a script.
- Click + parameters.
- Add or edit a parameter:
- Add: Click + new parameter.
Edit: Click any field on an existing parameter. - Type the Parameter Name.
- Click to select the Type of string:
- String: Shows the Value field.
- String (Masked): Masks the Value field with a dot for each character. Similar to a password field.
TIP
Once String (Masked) has been selected and saved on a parameter, the value will never be displayed again. A masked parameter cannot be reverted to an unmasked parameter.
- Type the Values. This could be a password or clientID.
TIP
Parameter values set here can be changed when using the Integration Hub Automated Job in a TECR or Deployment Plan Activity. .
- Add: Click + new parameter.
- Delete a parameter:
- Hover your mouse cursor over the parameter.
- Click the red X.
- Click Save & Close.
- Click + parameters.
- Upload your script: (Mandatory field.)
- Click Upload New File.
- Select the script. Only .js files can be used.
- Click Open.
TIP
There is currently no way to edit a script. You must upload a new script instead.
- Download the script by clicking on the download button on the right of the script name.

- Select a Trigger:

TIP
Jobs running on a schedule can only have one running instance at the same time. Automated jobs can have multiple running instances at the same time. For example, the same job can be triggered from multiple TECRs concurrently.
- If Scheduled Trigger is selected: Schedule the running of the script:
- Select a Frequency: (Mandatory field.)
- Minute.
- Hourly.
- Weekly.
- Monthly.
- Select the time period in Repeat Every. (Mandatory field.)
- Select the date the schedule will Start On. (Mandatory field.)
- Select a Frequency: (Mandatory field.)
- If Automated Job is selected:
- The script can be:
- Included in a Build from a System.
- Run as an Automated Job in a TECR or Deployment Plan Activity.
- The script can be:
- If Scheduled Trigger is selected: Schedule the running of the script:
- Click:
- Run & Close: To immediately run the script and close the pop up.
- Save: To save information but not close the pop up.
- Save & Close: To save and close the pop up and let the script run (if it is enabled) when it is scheduled.
TIP
After adding automated jobs, see how to use them to orchestrate events.
- Add: Click + New Job.
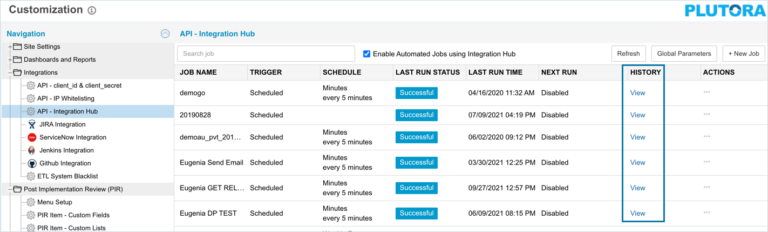
View Execution History
Click View in the History column to open the script execution history pop up for that job, which contains information about every time the script has run.
TIP
See Stop Automated Jobs below for how this pop up handles stopping jobs.

Click View in the pop up to open the log file of that run.
Log files open in a new browser tab when clicked. If no log file tab opens, check whether you have pop up blocking software blocking them.
Scripts that have been stopped by clicking a Stop button (a red square which appears when a job is running) will have a message written in their log file.
Stop Jobs
To stop a single instance of a job running:
- Open the job’s History.
- Click the red stop button on that running instance.

To stop all the running instances of a job at once, click the job’s red stop button on the Integration Hub grid.

Delete Automated Jobs
To delete a job from Integration Hub:
- Click the job’s Action menu in the grid (three horizontal dots)
- Select Delete.
- Click Yes to confirm.
Script Syntax
Supported Modules
Only the following supported NPMs can be used:
const querystring = require("querystring");
const https = require("https");
const http = require("http");
const fs = require("fs");
const AWS = require("aws-sdk");
const lodash = require("lodash");
const xml2js = require("xml2js");
const xlsx = require("xlsx");
const ssh2 = require("ssh2");
const ldap = require("ldapjs");
const csvtojson = require("csvtojson");
const oauth = require("oauth");
const request = require("request");
const openpgp = require("openpgp");
const axios = require("axios");
const showdown = require ("showdown1");
const jsonwebtoken = require ("jsonwebtoken");
const cryptJs = require ("crypto-js");
const uuidv1 = require("uuid/v1");
const uuidv3 = require("uuid/v3");
const uuidv4 = require("uuid/v4");
const uuidv5 = require("uuid/v5");
const fetch = require("node-fetch");
More modules will be added in the future.
Running Node Scripts
To execute NodeJS scripts on the platform, wrap the run command in a module.exports. The exported run function must return a promise and can be asynchronous.
let run = function(){
     return new Promise(function (resolve, reject) {
      /// Code here
      });
}
module.exports = {
run: run
};
Resolve and Reject
Failing a Job
To fail a job, the promise returned from the run function job should be rejected.
promise.reject(‘this is the fail message’);
Completing a Job
To complete a job, the promise returned from the run function job should be resolved.
promise.resolve(‘this is the success message’);
Using Parameters
User-defined parameters for each job, and admin-defined Global Parameters, can be referred to in the script. Parameters are passed into the main function in an object called arguments. The parameter names defined in the UI must exactly match your script and are case-sensitive.
Global Parameters
Global Parameter values can be referenced by every Integration Hub script that is either running on a recurring schedule or triggered as an Automated Job. To reference Global Parameter values defined on the Integration Hub grid, use the following code in your script:

let run = function (args) {

return new Promise((resolve,reject)=>{

console.log('Starting script');

//Declare variables and assign values passed in from Global parameters
var globalParameter1 = args.globalArguments.globalParameter1;
var globalSecret1 = args.globalArguments.globalSecret1;

console.log('Ending script');
resolve('Done');
    });
};

module.exports = {
    run: run
};
Job Parameters
Job Parameter values can only be referenced by the job they are defined for in Integration Hub. The list of parameters cannot be modified but the values can be modified when triggering the job as an Automated Job from Builds, TECRs, or Deployment Plan Activities. To reference Job Parameter values, use the following code in your script:

let run = function (args) {

return new Promise((resolve,reject)=>{

console.log('Starting script');

//Declare variables and assign values passed in from Job parameters
var jobParamter1 = args.arguments.jobParamter1;
var jobSecret1 = args.arguments.jobSecret1;

console.log('Ending script');
resolve('Done');
    });
};

module.exports = {
    run: run
};
Plutora Values
When running Automated Jobs that are linked to an Integration hub job, predefined field values will be available for the script to reference depending on where the job was triggered from.
Automated Job Name Parameter
The System’s Automated Job name field will always be available. To reference the Job field value, use the following code in your script:
let run = function (args) {

return new Promise((resolve,reject)=>{

console.log('Starting script');

//Declare variables and assign values passed in from the Automated Job Name field
var jobName = args.plutoraValues.JobName;

console.log('Ending script');
resolve('Done');
    });
};

module.exports = {
    run: run
};
Build Parameters
The GUID, ID, or Name fields for the Build, System, Release, Change, and Environment entities will be available when triggering the job from a Build. To reference the Plutora field values, use the following code in your script:

let run = function (args) {

return new Promise((resolve,reject)=>{

console.log('Starting script');

//Declare variables and assign values passed in from the Create Build form
var buildGuid = args.plutoraValues.Build.ID;
var buildNumber = args.plutoraValues.Build.BuildNumber;
var buildTag = args.plutoraValues.Build.BuildTag;
var buildBranch = args.plutoraValues.Build.Branch;
var buildSystemGuid = args.plutoraValues.System.ID;
var buildSystemName = args.plutoraValues.System.Name;
var buildReleaseGuid = args.plutoraValues.Build.Release.ID;
var buildReleaseIdentifier = args.plutoraValues.Build.Release.Identifier;
var buildReleaseName = args.plutoraValues.Build.Release.Name;
var buildChangeGuid = args.plutoraValues.Build.Changes[0].ID;
var buildChangesName = args.plutoraValues.Build.Changes[0].Name;
var buildEnvironmentGuid = args.plutoraValues.Environment.ID;
var buildEnvironmentName = args.plutoraValues.Environment.Name;

console.log('Ending script');
resolve('Done');
    });
};

module.exports = {
    run: run
};
TECR Parameter Values
The GUID, ID, or Name fields for the TECR, Build, System, Release, and Environment entities will be available when triggering the job from a TECR. To reference the Plutora field values, use the following code in your script:

let run = function (args) {

return new Promise((resolve,reject)=>{

console.log('Starting script');

//Declare variables and assign values passed in from the TECR form
var tecrGuid = args.plutoraValues.Tecr.ID;
var tecrTitle = args.plutoraValues.Tecr.Title;
var tecrReleaseGuid = args.plutoraValues.Tecr.Release.ID;
var tecrReleaseName = args.plutoraValues.Tecr.Release.Name;
var tecrNextAvailableStatusGuid = args.plutoraValues.Tecr.Statuses[0].ID;
var tecrNextAvailableStatusValue = args.plutoraValues.Tecr.Statuses[0].Value;
var tecrSystemGuid = args.plutoraValues.System.ID;
var tecrSystemName = args.plutoraValues.System.Name;
var tecrEnvironmentGuid = args.plutoraValues.Environment.ID;
var tecrEnvironmentName = args.plutoraValues.Environment.Name;
var tecrBuildGuid = args.plutoraValues.Build[0].ID;
var tecrBuildNumber = args.plutoraValues.Build[0].BuildNumber;
var tecrBuildTag = args.plutoraValues.Build[0].BuildTag;
var tecrBuildBranch = args.plutoraValues.Build[0].Branch;
var tecrBuildNote = args.plutoraValues.Build[0].BuildNote;
var tecrBuildReleaseGuid = args.plutoraValues.Build[0].Release.ID;
var tecrBuildReleaseIdentifier = args.plutoraValues.Build[0].Release.Identifier;
var tecrBuildReleaseName = args.plutoraValues.Build[0].Release.Name;
var tecrBuildChangeGuid = args.plutoraValues.Build[0].Changes[0].ID;
var tecrBuildChangesName = args.plutoraValues.Build[0].Changes[0].Name;
console.log(‘Ending script’); resolve(‘Done’); }); }; module.exports = { run: run };
Deployment Plan Activity Parameters
The GUID, ID, or Name fields for the Deployment Plan Activity, Deployment Plan, Build, System, and Environment entities will be available when triggering the job from a Deployment Plan Activity. To reference the Plutora field values, use the following code in your script:
let run = function (args) {

return new Promise((resolve,reject)=>{

console.log('Starting script');

//Declare variables and assign values passed in from the Deployment Plan Activity form
var deploymentPlanGuid = args.plutoraValues.DeploymentPlan.ID;
var deploymentPlanName = args.plutoraValues.DeploymentPlan.Name;
var deploymentPlanActivityGuid = args.plutoraValues.DeploymentPlanActivity.ID;
var deploymentPlanActivityName = args.plutoraValues.DeploymentPlanActivity.Name;
var deploymentPlanActivitySystemGuid = args.plutoraValues.System.ID;
var deploymentPlanActivitySystemName = args.plutoraValues.System.Name;
var deploymentPlanActivityEnvironmentGuid = args.plutoraValues.Environment.ID;
var deploymentPlanActivityEnvironmentName = args.plutoraValues.Environment.Name;
var deploymentPlanActivityBuildSystemId = args.plutoraValues.Build[0].SystemID;
var deploymentPlanActivityBuildSystemName = args.plutoraValues.Build[0].SystemName;
var deploymentPlanActivityBuildGuid = args.plutoraValues.Build[0].ID;
var deploymentPlanActivityBuildNumber = args.plutoraValues.Build[0].BuildNumber;
var deploymentPlanActivityBuildTag = args.plutoraValues.Build[0].BuildTag;
var deploymentPlanActivityBuildBranch = args.plutoraValues.Build[0].Branch;
var deploymentPlanActivityBuildNote  = args.plutoraValues.Build[0].BuildNote;
var deploymentPlanActivityBuildReleaseGuid = args.plutoraValues.Build[0].Release.ID;
var deploymentPlanActivityBuildReleaseIdentifier = args.plutoraValues.Build[0].Release.Identifier;
var deploymentPlanActivityBuildReleaseName = args.plutoraValues.Build[0].Release.Name;
var deploymentPlanActivityBuildChangeGuid = args.plutoraValues.Build[0].Changes[0].ID;
var deploymentPlanActivityBuildChangesName = args.plutoraValues.Build[0].Changes[0].Name;

console.log('Ending script');
resolve('Done');
    });
};

module.exports = {
    run: run
};
Use the Date and Time of the Last Execution
If your job fails mid-execution, you may lose data. The new argument, LastSuccessfulRun, allows you to go back to the last time your job executed correctly and get data from that time.
The date and time of the last execution is always included in the args object. You can retrieve this value using the following code, in order to find the updates since the last run:
let run = function (args) {

    var LastRunDate = args.lastRunDateUtc;
    var LastSuccessfulRun = args.lastSuccessfulRunDateUtc;

}
Logging and Error Handling
Log files can be made more meaningful by using the following commands to label logs as warnings, errors, and so on.
| Command | Log Output Prefix |
| console.log(…args); | [LOG] |
| console.info(…args); | [INFO] |
| console.warn(…args); | [WARN] |
| console.error(…args); | [ERROR] |
| console.dir(…args); | [DIR] |
| console.trace(…args); | [TRACE] |
Log Format: [{DateTime}] [{Prefix}] – {args}
Example: [2018-07-10T02:46:01.798Z] [LOG] – Logging at interval: 1