Creating Forecasts and Entering Actuals
Project financial entries are managed in the project's Financials section. If you do not see this section in the project's left-hand navigation links, please contact your PPM Pro administrator and request to add the section to the project's category. Also note that the entries themselves require the appropriate permissions to edit and/or view forecasts and/or actuals.
The Financial Entries grid is where project forecasts and actuals (referred to in tandem as "financial entries") can be easily managed. Project managers can manage the process start to finish by recording all the entry amounts, or the process can include project resources, who, with the appropriate permissions, can enter the actuals along with any required documentation/invoices/receipts.
Note: The screenshots in the documentation might not match what you see on your screen, because each customer can specify the columns to appear on the grid and the fields to appear in the Details modals.
For more information, see About Financial Entries and Working with the Financial Entries Grid
Automatic Contours vs Custom Contours
A "contour" is a distribution of an amount across an interval of time. The Financial Entries contour interval is one month.
Automatic contours are the even values that are distributed when a lump sum amount is entered (for a forecast or actual) along with a To Date (remember From Dates are always required). The system automatically spreads the amount across the intervals/months of the date range defined by the From and To Dates. If you enter From and To dates and the contours pane is hidden, the amounts will still be automatically contoured, and will be visible when you show the contours pane.
Custom contours are the uneven values that result from manually editing contours (well, you can manually edit and still make the contours even, but we assume if you want even contours you'll let the system do the math for you). For example, instead of entering a lump sum amount, you can enter monthly values of any amount; the system will sum of all the manual entries and display the total amount in the appropriate Entry Amount field. Similarly, you can start out with automatic contours, and then adjust the existing amounts, or add (or delete) additional distributions. Any time you edit the contours, the Entry Amount field will be adjusted accordingly.
Financial entries require a From Date, but the To Date is optional. Note that using a To Date is only relevant if you want to distribute amounts across a date range, regardless of whether the contours pane is displayed.
Labor and Capitalized Entries
If you check the Labor and/or Capitalized properties for a forecast (assuming they are included on the forecast category), then any associated actuals will inherit the forecast setting(s).
Summary Row/Variance
The first row of the Financial Entries grid is a summary of forecast and actuals amounts. What each user sees depends on their permissions - if no permission to view forecasts, for example, then no total amount will be displayed (and the New Forecast button will not be displayed). You can eyeball the total variance (difference between forecasted and actuals amounts), or you can use the Variance field.
The Variance field displays, per entry, the difference between the forecast amount and the sum of its actuals; in the summary row, the Variance field displays the difference between the sum of all forecast amounts and the sum of all actuals. If you do not see the Variance field in your grid columns, first click the Column Settings icon and check if the Variance field is in the Available Fields pane. If it is, drag it over to the "Fields displayed..." panel and place it where you want it to appear in the grid. If you don't see the field, contact your PPM Pro administrator.
Inflow and Outflow
All financial entry categories include a "Cash" setting, which is configured as either "Inflow" or "Outflow". When you enter forecasts and actuals, the type (category) of the entry determines whether the amount is added to the revenue stream (inflow), or is an expense item (outflow).
Creating Forecasts
- Navigate to yourProject/Financials.
- Click the New Forecast button and choose the type (category) of Forecast. If there is only one category of forecast, then clicking the New Forecast button opens the New Forecast dialog (no list of categories presented).
- Enter minimally a Title, Amount, and Entry From Date. If you want the amount to be distributed across a date range, enter a To Date. You can always go back and add a To Date at a later time.
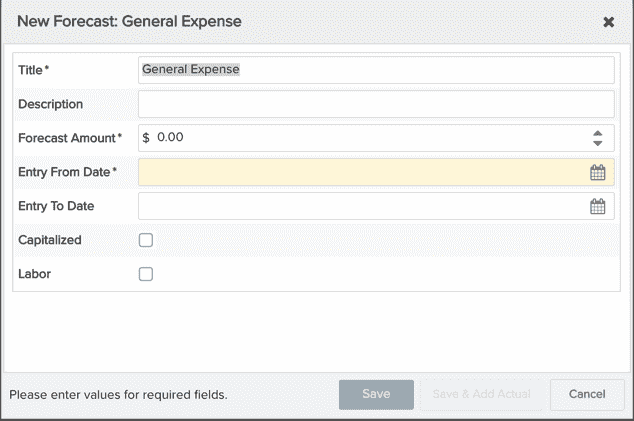
- Click Save and the grid displays the entry and updates the summary amount. If you wish to create an actual for the forecast, click Save & Add Actual, and the New Actual: <category name> dialog appears (see below in Creating Actuals).
- Click Close after clicking Save (once you are done adding actuals).
Creating Actuals
You must have at least one forecast before you can create an actual. Actuals are always associated with a forecast, and will be created with the same category type as the forecast.
- Navigate to yourProject/Financials.
- Select the forecast the actual will be applied to by highlighting it in the grid.
- Click the Add Actual button, or right-click and choose Add Actual from the context menu.
- Enter minimally a Title, Amount, and From Date. If you want the amount to be distributed across a date range, enter a To Date. You can always go back and add a To Date at a later time.
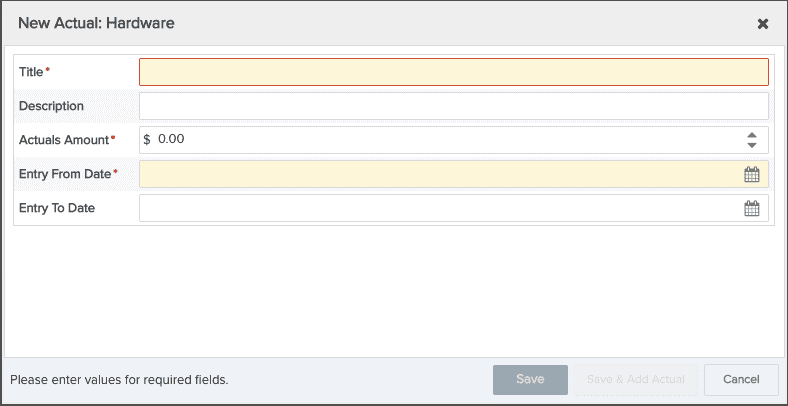
- If you do not want to enter another actual, click Save, otherwise, click Save & Add Actual.
Actuals entries appear under the parent forecast.
Deleting Entries
You can delete an actuals entry by selecting it and choosing Actions > Delete, or right-clicking and choosing Delete from the context menu. The Actual Amount in the summary row will be updated.
You can delete a forecast the same way, but only if there are no actual associated with it. If there are actuals, you will see a message like the following:
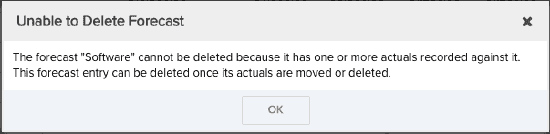
Delete the actual(s), then delete the forecast entry. Note also that if there are items such as notes or attachments associated with the forecast entry, these items will be removed when the forecast is deleted (you will be prompted to confirm). Once the forecast is deleted, the Forecast Amount in the summary row will be updated.
Editing Entries
After creating an initial entry, you can go back and make edits at any time. Simply double-click on the record, or select it and choose Actions > Edit Entry (or right-click and choose Edit Entry from the context menu). The Details modal will display, where you can make entry edits, and manage notes and attachments. Note, however, that if you have customized the contours and you make changes to the entry's amounts or dates, you will ask to confirm an even "re-spreading" of the contours. See Editing Contours and Dates, above.