
Creating Permissions-Based Entity Teams
This topic applies to Enterprises, Divisions (formerly Business Units), and Departments (formerly Programs). For Projects, Portfolios, Assets, Filters, Reports, and Dashboards, see Creating Profile-Based Entity Teams.
Teams are comprised of users who are assigned rights to an entity. When you assign a user to a team you can specify the permissions for that user at the same time.
Each entity has a similar set of rights; all entities include the right to "create". Most entity team members can be assigned the following rights: Edit This Item, Edit Team, and View Rollups. Team members can have any combination of these rights. See Entity Team Permissions for a description of each permission.
Note: Entity team rights are granted for an instance of an entity . For example, the XYZAccount entity team grants permissions for that single XYZ account, whereas the Admin Account team grants permissions for ALL accounts.
For more information, see About Entity Teams and About Groups.
To create a team
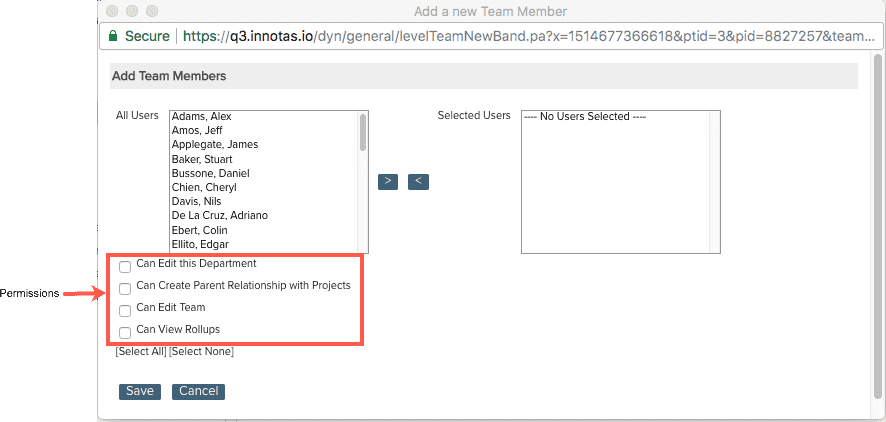
- Navigate to the Team page for the entity for which you are creating a team. For example, to create a Department team, navigate to Departments list and open a department. Then click the Team link in the left navigation panel (other entities have Team tabs in their Info panels).
- Choose Menu > New Team Members.
- In the Add Team Members dialog, select the user you would like to add to the team. To select multiple users, hold down the control key as you select users. Remember to choose users who will have the same rights.
- Choose the rights that you would like to assign to the users by selecting the appropriate check boxes. The screenshot below shows the Add Team Members dialog and permissions for a department.
- Click Select.
Note: If you wish to assign different rights to different users, you must add each user separately, select the right(s), click Select, and then repeat the process.
Emailing Team Members
Each permissions-based entity team includes an email function.
Email functions use the Innotas application mail feature rather than your local client email application. Email can be sent from any computer using Innotas without the need for a local email application.
There is a limit of 25 recipients per email.
When emailing Teams, a copy of the email is also copied to the sender. This allows you to track sent emails in your own email application.
To email one or multiple team members from any team list screen
- Select each team members you wish to send email to.
- Click the Send Email button.
- Enter your message text and edit the subject if desired.
- Click Send.