Working with Timesheets
This video provides an overview of Timesheet Entry including navigation of the timesheet facility and additional timesheet features. Duration: 7 min.

For general information about timesheets, see Timesheet Overview. If you are a user with administrative privileges, see About Timesheet Administration.
The timesheet is comprised of three panels: the timesheet grid, the daily entry pane, and the notes list. You can hide/display the daily contours panel, and expand/collapse the notes list. Configure the display in a way that suites your needs.
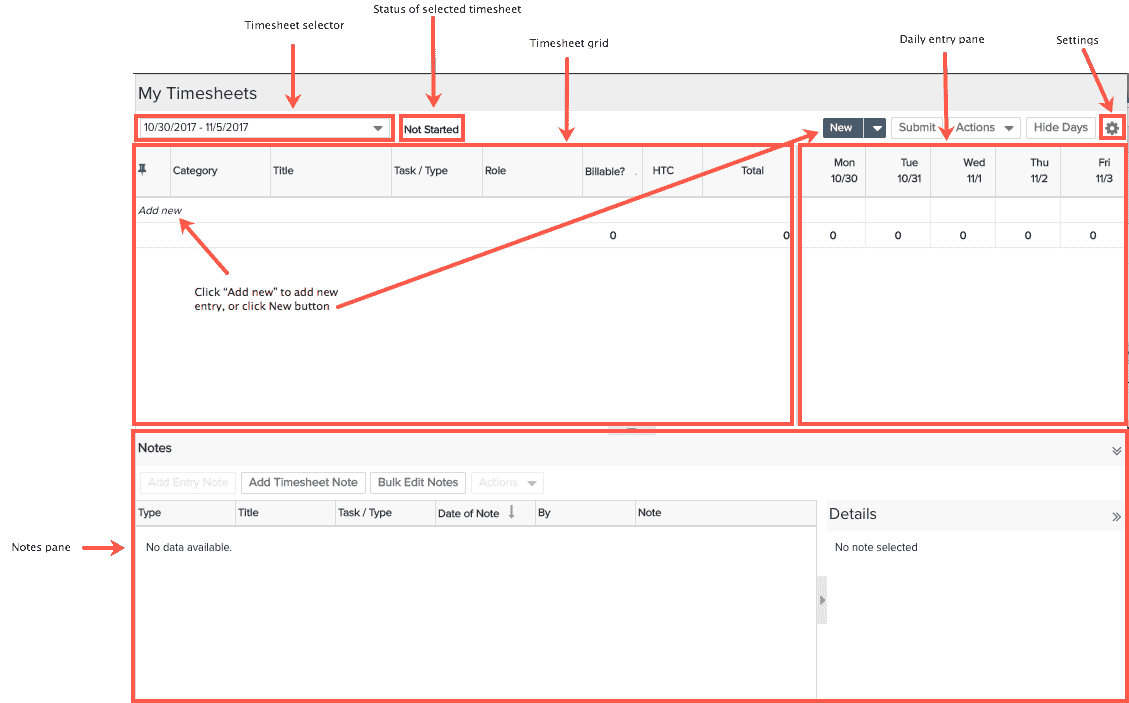
You can't add or delete columns from the grid. You can configure which days of the week to display in the daily entry pane. You must show at least one day.
Viewing Timesheets
When you first enter the timesheet screen, the system will check to see if the 3 previous timesheets (not the current timesheet) have a status of Not Started, In Progress, or Rejected. If one or more of these 3 timesheets with these statuses exist, the most current one is displayed. If no previous timesheets have any of these statuses, then the timesheet for the current period is displayed.
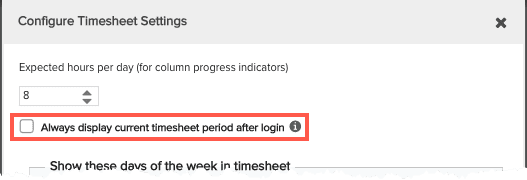
If you always submit your timesheets on time, then you always see the current timesheet. If you change to a different timesheet, your selection will be preserved even if you navigate away. If you would prefer to always see the current timesheet when you initially enter the screen, there is a setting called "Always display current timesheet period after login" in the Configure Timesheet Settings dialog that allows you to indicate this preference (shown below):
Note that timesheets are generated automatically by PPM Pro, provided that the resource's timesheet activation date has been set. See Activating/Generating Timesheets.
To enter time, use the timesheet droplist to select a timesheet (identified by its date range). The droplist contains the current timesheet, the five previous timesheets, and the next four (future) timesheets. (Note that if your organization does not support access of future timesheets, you will not see any in your droplist.) You also have the option to view the last 6 months of timesheets by clicking view all timesheet periods for the past 6 months.
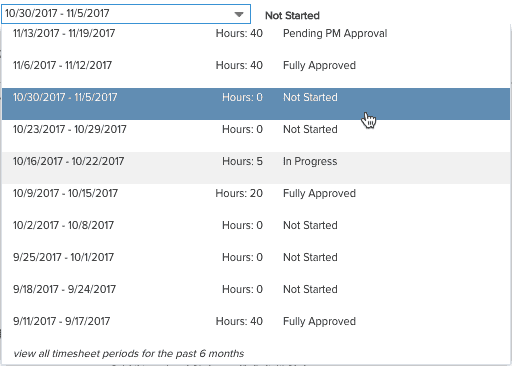
Timesheet status
Timesheet status is indicated by the label to the right of the date range, as well as in the toolbar next to the droplist, as shown in the screenshot above. The statuses are the following:
-
Not started - No time has been entered on this timesheet
-
In progress - Some time has been entered on this timesheet, but it has not been submitted. The status remains "In progress) even if the user creates an entry and then deletes it.
-
Awaiting PM Approval - (if using 2-step approval) Timesheet has been submitted to the project owner. The timesheet cannot be edited by the submitter.
-
Pending Final Approval - PM has approved (if using 2-step approval) and timesheet is awaiting final approval. The timesheet cannot be edited by the submitter.
-
Fully Approved - The timesheet has been approved by timesheet approver. The timesheet cannot be edited by the submitter.
Rejected Timesheets
If you are using 2-step approval and a PM rejects a timesheet entry (or entries) and the rest of the timesheet is approved, you will only be able to edit the rejected entries; all approved entries will be read only.
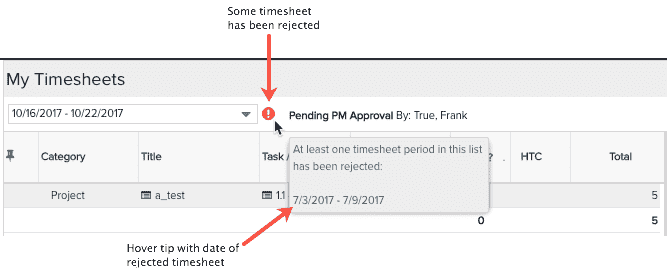
If a timesheet is rejected, you get a warning message at the top of the rejected timesheet. However, if you have navigated away from that timesheet the UI gives a subtle reminder with an ![]() icon to the right of the Timesheet droplist. This icon means that some timesheet in the list has been rejected. If you hover over the
icon to the right of the Timesheet droplist. This icon means that some timesheet in the list has been rejected. If you hover over the ![]() , the hoverhelp will tell you exactly which timesheet was rejected:
, the hoverhelp will tell you exactly which timesheet was rejected:
Configuring the Daily Entry Pane
You can specify which days to display in the daily entry pane. You can also specify the expected hours used to measure progress. The daily entry pane works in conjunction with the 'Total' field (if your organization allows the 'Total' field to be editable). When editable, you can enter a lump sum of hours in the Total field, and the system will evenly distribute the hours as described below in #3.
Click the Settings icon ![]() . The Configure Timesheet Settings dialog appears.
. The Configure Timesheet Settings dialog appears.
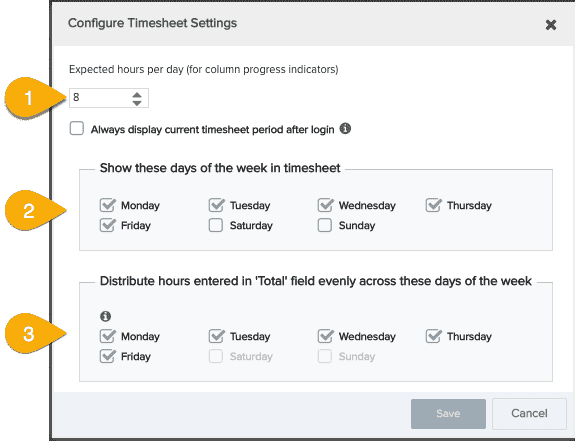
1. Enter the number of expected work hours/day to calibrate the system to measure progress against your company's expected workday hours. This setting has no effect on company time calculations, but is used only for the progress indicators described below.
2. Choose which days to display in the daily entry pane. By default, the pane displays Mon-Fri. You must display at least one day. Note that you can only remove days from the daily entry pane provided they have no hours entered in them. Zero out any hours for In Progress timesheets that have hours attributed to a day or days you wish to remove.
3. (You will see setting 3 only if your organization allows entering a lump sum of hours in the 'Total' field. This is sometimes referred to as "bucket" entry.) Choose days across which to distribute hours entered in the 'Total' field. For example, you might like to see Saturday and Sunday displayed in your grid, but when you enter "bucket" hours you want them distributed across Monday-Friday. Some organizations prefer to use the Total field to simply record the lump sum hours for the week and are not interested in distributing hours to individual days. In this case, put one day on the grid and hide the contours pane. Then you can just enter the weekly total in the Total field.
Progress Indicators
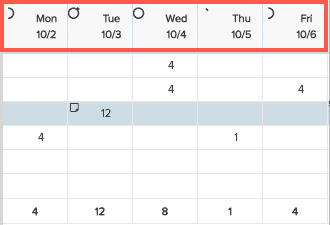
As you enter hours (either daily or in the Total field), a green circle renders around the date and indicates a (visual) completion percent. For example, if your expected hours/day = 8 and you have entered 8 hours for a day, then a full circle will render around the date. 1/2 circle represents half of the hours (4 out of 8, for example), and so on. The screenshot below shows several days at various stages of completion:
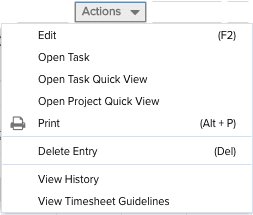
The Actions Menu
The Actions menu contains a list of operations for timesheet entries. This menu is also available by right-clicking a task. Most of the menu options have a keyboard equivalent, which is displayed on the menu next to the operation.
|
Action |
Description |
|
|---|---|---|
|
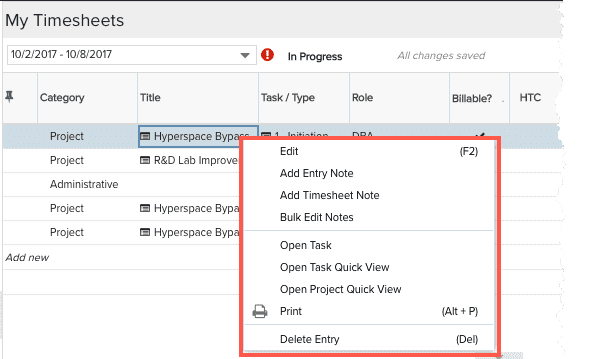 |
Edit (F2) |
Invokes the inline editor. You can also double-click the record, or select the record and press F2. |
|
Open Task |
Opens the standalone view of the task. |
|
| Open Task Quick View | Opens a quick view of the tasks, which contains the task name and owner, the status, and the task date range. | |
|
Open Project Quick View |
Opens a quick view of the project, which contains the project name and owner, the project start and end dates, and the user's allocation start and end dates. |
|
|
|
Prints the timesheet grid and list of notes (sorted by note type). |
|
|
Delete Entry (Delete) |
Deletes the entry. |
|
|
View History |
Displays a window containing all actions taken on the timesheet. See Timesheet History for more information. |
|
|
View Timesheet Guidelines |
Displays a popup containing information your organization has configured. See Timesheet Guidelines |
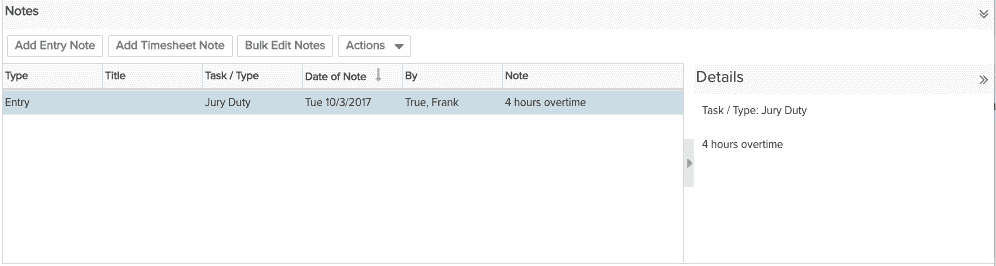
Timesheet Notes
You can enter one or more notes for any timesheet entry, either one at a time or with the bulk note editor (see Bulk Edit Timesheet Notes), and the timesheet as a whole. You can create notes at other times, such as when a timesheet is submitted, approved, or rejected. All notes appear in the Notes pane at the bottom of the Timesheets page. The Type column reflects the kind of note: Entry, Timesheet, Rejection, Approval, and Submission. See Timesheet Notes for more information.