Setting Up Release & Verify API
The following article explains how to set up and test the Release & Verify API manually using Postman. See Visualize Release & Verify's API With Swagger for the interactive Swagger API documentation.
You can also download the Release & Verify REST API Primer v1.4.1 and sample scripts.
TIP
For better performance, GET [entity] requests should use a paginated format. For example, GET releases?pageNum=0&recordsPerPage=10
TIP
You can now filter and paginate API calls

For a full list of Release & Verify API functions, see the Release & Verify API help pages:
- https://usapi.plutora.com/swagger
- https://ukapi.plutora.com/swagger
- https://auapi.plutora.com/swagger
To set up access to API:
1a. Enable API in Release & Verify’s API Customization and generate a client_id and client_secret
TIP
API requests have a rate of throttling per API key to 26,000 requests per hour
To enable the API:
- Go to Settings
 > Customization >Integrations.
 - Click API – client_id & client_secret.
- Click to select the Enabled checkbox.
- Click Generate New Client Credentials.
- Copy and save the client_ID and client_secret.

The content of these fields is machine-generated and cannot be edited.
1b. Enable API in Release & Verify Test’s API Customization and generate a client_id and client_secret
To enable the API of Release & Verify and generate API keys:
- Click Settings.

- Click the Integrations tab.
- Click API.

- Click to select the Toggle to enable/disable API access checkbox. The API Status will change to Enabled.
TIP
Administrators need the API Access Permissions user permission to view this checkbox. Users who lack that permission will be able to see the API Status, API Client ID, and API Client Secret but will not be able to edit them.
Click Generate New API Keys. - Copy and save the API Client ID and API Client Secret.
2. Download and install Postman app
To download and install the Postman app:
- Go to https://www.getpostman.com/apps.
- Click the Download button for your platform. (Mac, Windows, or Linux.)
- Install Postman app:
- For Windows:
- Click the downloaded file to run the installer.
- Follow the prompts.
- For Mac:
- Double click to open the downloaded zip file.
- Drag the Postman app into your Applications folder.
- For Linux:
- For Windows:
3. Retrieve a Token from the Authorization Server and test the connection
TIP
Tokens expire in 24 hours. After 24 hours, please create another token.
To use Postman app to retrieve a token from the authorization server:
- Click to open Postman app.

- Click Create basic request.


- Save your request by:
- Typing a Request name and Request description.
- Selecting a Collection.
- Clicking Save.
- Select Post from the Get drop-down menu.

- Select OAuth 2.0 from the Type drop-down menu under the Authorization tab.
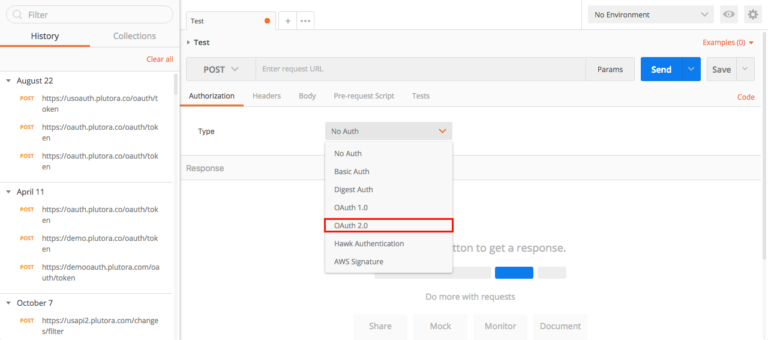
TIP
Release & Verify API does not allow No Auth.
Type the Request URL into the Enter request URL field.

The Request URL for all of Release & Verify's modules is:
https://[Country code: us, uk, au]oauth.plutora.com/oauth/token
For example, US customers would type: https://usoauth.plutora.com/oauth/token - Click the Body tab.

- Click to select the x-www-form-urlencoded radio button.

- Click the Key field and type or paste client_id.
- Click the Value field and paste in the client_id generated in step 1.

- Continue until you have added all the keys and values in the table below.
| Key | Value |
| client_id | Paste the client_id generated from Release & Verify. |
| client_secret | Paste the client_secret generated from Release & Verify. |
| grant_type | Type “password”. (The actual word “password”, not your Release & Verify password.) |
| username | Type the email address you use to log into Release & Verify. |
| password | Type the password you use to log into Release & Verify. |
Your screen should look like this:

- Click Send.
After a few seconds of loading, the access token should appear.If using credentials from Release & Verify you may need to click Send a second time.
- Copy and save the access token without the double quotes.
If you get an error message instead, your Headers tab may not be blank. See the Troubleshooting section below.
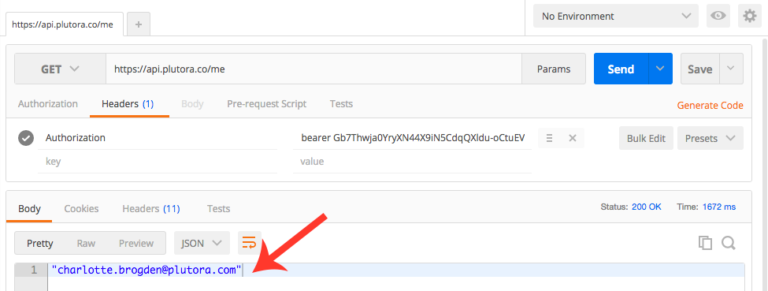
- To test your API connection:
- Select Get from the Get drop-down menu.
- Click the Headers tab.
- Click the Key field and type Authorization.
- Click the Value field and type bearer, type a space, then paste the access token.
Your screen should look like this. - Type the relevant URL below in the Enter request URL field:

- US: https://usapi.plutora.com/me
- UK: https://ukapi.plutora.com/me
- AU: https://auapi.plutora.com/me
- Click Send.
Your email address should appear.
Use POST to copy a Release
PUT /releases, POST /releases, and POST /releases/bulk do not support the selection of Phase or Gate migration and therefore Activities related to the parent, associated TECRs, approvals, and so on are not adjusted. We recommend using the UI instead of the API when adding or updating a Release’s parent or child Release.
For POST /releases the following business logic applies:
- The Implementation Date can be in the past, present, or future.
- The Release Status must not be in an End State.
- Project and Independent Releases, but not Enterprise Releases, can be POSTed to.
To use POST to copy a Release (after following the instructions above):
- Find the ID of a Release to copy:
- Select Get from the Get drop-down menu.
- Type the relevant URL below in the Enter request URL field:
- Click the Headers tab.
- Click the Body tab under the Headers tab.
- Select Pretty and JSON if they are not already selected.
- Click Send.
A high-level view of all the Releases will appear.

- Find and copy the id of the Release you would like to copy.
- Show the Release you would like to copy:
- Type a / in the Enter request URL field, then paste the Release ID:
- US: https://usapi.plutora.com/releases/ID
- UK: https://ukapi.plutora.com/releases/ID
- AU: https://auapi.plutora.com/releases/ID
For example:
https://ukapi.plutora.com/releases/3...0-2d8341d624e6
- Click Send.
- Copy the Release data.
- Type a / in the Enter request URL field, then paste the Release ID:
- Copy the Release:
- Select Post from the Get drop-down menu.
- Type the relevant URL below in the Enter request URL field:
- US: https://usapi.plutora.com/releases
- UK: https://ukapi.plutora.com/releases
- AU: https://auapi.plutora.com/releases
- Click the Body tab.
- Click to select the raw radio button.
JSON (application/json) should be automatically selected. If not, select it manually. - Paste the Release data into the top field.
- Make any changes you like to the data, for instance, adding the text Copy to the name field so that the name of the new Release is different.
- Click Send.
- Go to Release > Manager > Releases toggle button and search for your new copied Release.
An example script to download
Release & Verify REST API example.
Troubleshooting
Error: invalid_grant error_description: The client_id or client_secret is incorrect
If you receive the following error message while retrieving the access token:
{
 "error": "invalid_grant",
 "error_description": "The client_id or client_secret is incorrect."
 }
Solution: Your client_id and client_secret may have expired or been changed
Get a new client_id and client_secret by repeating the steps shown on this page under:
1. Enable API in Release & Verify’s API Customization and generate a client_id and client_secret.
Then repeat the steps under :
3. Retrieve a Token from the Authorization Server and test the connection.
Solution: Your Headers tab may not be blank
Your Headers tab may contain Key or Value data fields:

Delete your Key or Value data fields so that your Headers tab looks like the following image and go through the steps of retrieving the access token again.

Error: validation_error, error_description: Login failed, you have 5 attempts to login
If you receive the following error message while retrieving the access token:
{
 "error": "validation_error",
 "error_description": "Login failed, you have 5 attempts to login"
}
Solution: Check your username and password
You may have entered your username and password incorrectly.
Your user account may be locked if you enter your username and password incorrectly too often. Your administrator can unlock your account.
![]()
Error: Could not get any response
If you receive the following error while retrieving the access token:
Could not get any response There was an error connecting to https://oauth.plutora.com/oauth/token. Why this might have happened: -The server couldn't send a response:Ensure that the backend is working properly -SSL connections are being blocked:Fix this by importing SSL certificates in Chrome -Cookies not being sent:Use the Postman Interceptor extension -Request timeout:Change request timeout in Settings> General
Solution: Incorrect Enter request URL
You may have entered the Request URL incorrectly. Re-enter it and try again.
Error: The request entity’s media type ‘text/plain’ is not supported for this resource.
If you receive the following error while POSTing:
{
 "message": "The request entity's media type 'text/plain' is not supported for this resource."
}
Solution: Select JSON

Make sure that the raw type selected is JSON (application/json). Then hit Send again.